This is the multi-page printable view of this section. Click here to print.
Operations
- 1: Kubernetes
- 2: Monitoring
- 3: AWS Hosting
- 4: Bare-Metal Hosting
1 - Kubernetes
2 - Monitoring
3 - AWS Hosting
4 - Bare-Metal Hosting
This page serves as a reference for how and why we set up the server the way we did. As a short overview:
We are using the following software to manage our server:
- RKE2: A Kubernetes distribution that is easy to install and relatively robust.
- Longhorn: A storage solution for Kubernetes that uses the local hard-drive.
- Nginx-Ingress: A reverse proxy that is used to route traffic to the correct service.
- Cert-Manager: A Kubernetes add-on that automates the management and issuance of TLS certificates from letsencrypt.
- Sealed Secrets: A tool for encrypting Kubernetes Secrets into a format that can be safely stored in a public repository.
- ArgoCD: A declarative, GitOps continuous delivery tool for Kubernetes.
- Kustomize: A tool for joining & customizing YAML configurations.
- Helm: A package manager for Kubernetes that makes installing application pretty simple.
We are using a single rocky linux server running RKE2 (a Kubernetes Distribution). All software that is running on the server is defined in our argocd repository. This is picked up by ArgoCD (running on the server) and applied continuously, so any changes to the repository are automatically applied to the server. This also means, manual changes will be discarded within seconds.
Overview Diagram
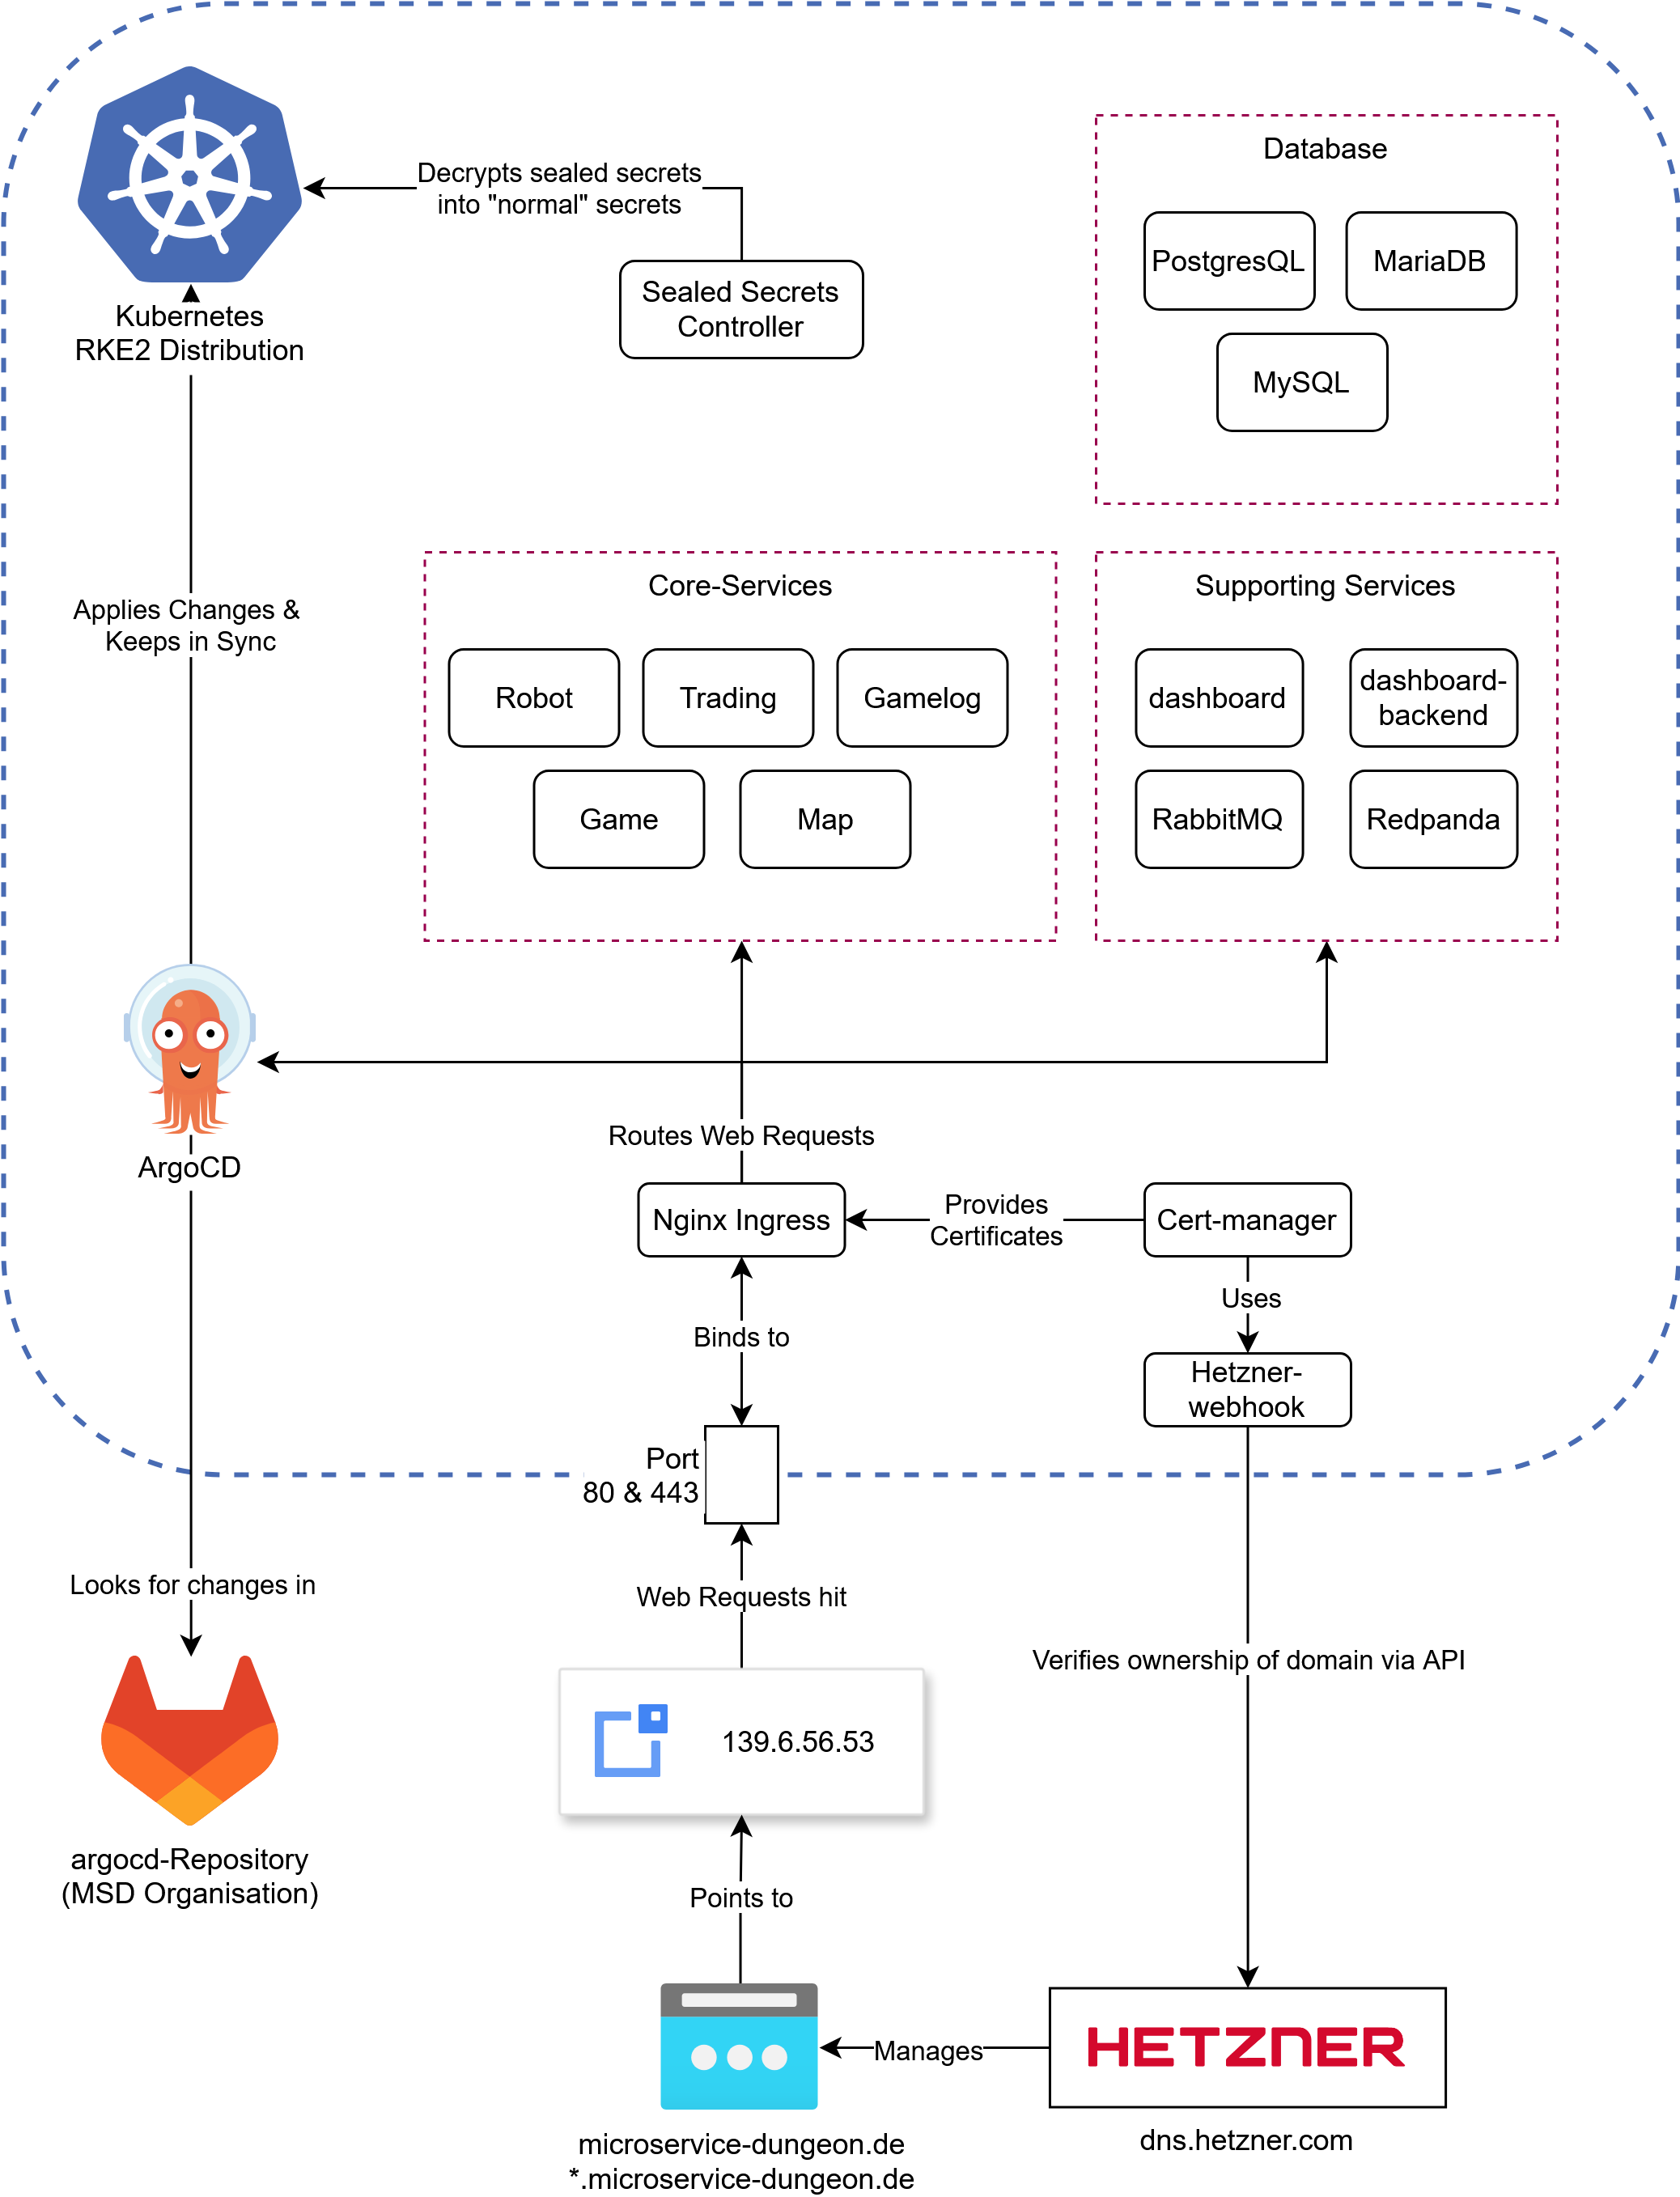
An overview of (almost) all the components running on our server, note that everything in the blue lines is running in Kubernetes
Lets dig into the components shown in here. Starting off with the most important:
ArgoCD
The core principle of ArgoCD is pretty simple: if you want to make a change to your cluster, what do you do?
Use kubectl apply -f my-manifest.yaml. This is essentially what argoCD does, but slightly more sophisticated
and static. Every Manifest you define in an “Application” (we’ll get to that) is applied to the cluster.
The good thing: you can reference a Git repository, and ArgoCD will automatically apply any changes to the cluster.
Under the hood, ArgoCD uses Kustomize, which is a powerful tool for combining, patching and generally customizing YAML files on the fly. For example, if you have two yaml files:
- ingress.yaml
apiVersion: networking.k8s.io/v1 kind: Ingress metadata: name: game spec: ingressClassName: nginx rules: - host: game.microservice-dungeon.de http: paths: - backend: service: name: game port: number: 8080 path: / pathType: Prefix - service.yaml
apiVersion: v1
kind: Service
metadata:
  name: game
spec:
  ports:
  - name: http
    port: 8080
    protocol: TCP
    targetPort: 8080
  selector:
    app.kubernetes.io/instance: game
    app.kubernetes.io/name: game
  type: ClusterIP
You can use Kustomize to combine them into a single file, which can then be applied to the cluster.
In fact, kubectl has built-in support for Kustomize. To know which files to combine how, you have to use
a kustomization.yaml file (named exactly like this), which looks like this:
kind: Kustomization
apiVersion: kustomize.config.k8s.io/v1beta1
resources:
  - ingress.yaml
  - service.yaml
If you run kubectl kustomize . in the directory where the kustomization.yaml file is located, it will
combine the two files into a single file and print it to the console.
This is what ArgoCD does, but it does it for you. You define an “Application” in ArgoCD
which is a pointing to a kustomization.yaml file in a Git repository.
ArgoCD will then automatically apply any changes to the cluster -
just like running kubectl apply -k . in the directory where the kustomization.yaml file is located -
but automatically and continuously as the files change.
Now, we are not only using plain yaml files, but also Helm charts. These are a bit more complex (see Helm if you want to learn what they are and why we use them).
Simply said, Helm is a package manager, which you can use to install applications on your cluster. Most of the time you customize the installation with “values”, which are basically installation
options defined in yaml. Kustomize can be used to render a helm chart but you need to use the --enable-helm flag. For example a kustomization.yaml for cert-manager would look like:
kind: Kustomization
apiVersion: kustomize.config.k8s.io/v1beta1

helmCharts:
  - name: cert-manager
    repo: https://charts.jetstack.io
    version: v1.17.0
    releaseName: cert-manager
    namespace: cert-manager
    valuesFile: certmanager-values.yaml
With the cert-manager-values.yaml file looking like this:
crds:
  enabled: true
This will install cert-manager into the cert-manager namespace,
using the certmanager-values.yaml file to customize the installation. Under the hood ArgoCD converts the chart into
yaml files, you can see this by running kubectl kustomize . --enable-helm in the directory where the kustomization.yaml file is located.
Helm has to be installed on your system for that to work.
In the ArgoCD install process we have set the following parameters to enable Helm support:
configs:
   cm:
    create: true
    kustomize.enabled: true
    helm.enabled: true
    kustomize.buildOptions: --enable-helm
Sealed Secrets
In order for us to store secrets like passwords and other sensitive configurations in our git repo, we need to encrypt them. This is where Sealed Secrets comes in. This is a tool that uses asymmetric encryption with a public and private key to encrypt secrets. You can use the kubeseal cli to encrypt an existing secret like this:
kubeseal --cert sealing-key.pem < secret.yaml > sealed.yaml
This assumes that there is a sealing key (a public key/certificate) lying somewhere on the machine you are using kubeseal on. In our ArgoCD
repository it is provided in the applications folder. If you dont have the key, but have kubectl access,
you can use kubeseal to either fetch the sealing key with
kubeseal --fetch-cert > cert.pem or use kubeseal directly:
kubeseal \
-f path/to/unencrypted/secret.yaml \
-w output/path.yaml \
--controller-name=sealed-secrets \
--controller-namespace=sealed-secrets \
--format=yaml
Once you apply a sealed secret to the cluster, the controller will decrypt it and make it available under the name and namespace of the original secret.
Updating / Merging a secret:
You can merge / update a sealed secret by creating a secret with the same keys as the original
secret and using the --merge-intocommand. Suppose you have your sealed secret sealed.yaml:
apiVersion: bitnami.com/v1alpha1
kind: SealedSecret
metadata:
  name: game-sensitive-config
  namespace: core-services
spec:
  encryptedData:
    DB_NAME: AgCgSNobnCxjTaOpYcDwwfUEqeCAL6loxQDqzWIIgna7B58gbTC3MWUio/...
    DB_PASSWORD: AgBmAh8Yi8Dz+gqVF1GwiFnooEfv8o3xYL3UHEDUhVK2rmSd1f7BHUGVE...
    DB_USER: AgBbVZ99mft7oVuWcHpSV0D+hRRvFousesknAxfVgMdOwRO1BzTYin1SmlRdf...
    RABBITMQ_PASSWORD: AgB5fB3P3O/tLuJyPjg7cu3TQcebJAWJbsqoR4ucy8Z8WFhFJ9L...
and the values you want to change in secret.yaml:
apiVersion: v1
kind: Secret
metadata:
  name: any-name-works
  namespace: core-services
type: Opaque
stringData:
  DB_NAME: "database"
  DB_PASSWORD: "password"
Use the following command to update the sealed secret (optionally with the --cert flag for local use)
kubeseal -o yaml --merge-into sealed.yaml < secret.yaml
Some notes:
- Sealing keys will automatically rotate every 30 days, so you should re-fetch the sealing key every once in a while. If you keep the private keys backed up somewhere, you also need to re-fetch them, as they will also be rotated. This security feature ensures that if one of your decryption keys is compromised, it will only affect the last 30 days.
- Do not commit any unsealed secrets to the repository. If you do, change all the passwords of affected services. Dont just delete the secret, or encrypt it afterwards.
- Sealing is designed to be a one way process. You can unseal a sealed secret if you have the private key but that is not recommended by the developers.
Ingress & TLS
An Ingress is used to route traffic to the correct service. It does so based on host and path, in our case for
example: game.microservice-dungeon.de will route to the game service, while robot.microservice-dungeon.de
will route to the robot service. Some resources might need encryption, in our setup we can use cert-manager
to issue TLS certificates from letsencrypt. You just need to include the annotation
cert-manager.io/cluster-issuer: letsencrypt-production and the tls section in your ingress resource:
  tls:
    - hosts:
        - my.domain.com
      secretName: some-secret-name
Afterwards cert-manager will issue a certificate for your ingress.
If you want to read more about how cert-manager works, read the letsencrypt documentation on HTTP01 and DNS01 Solvers. We use the hetzner-webhook to issue DNS01 challenges, so you can also issue wildcard certificates.
Storage
Storage is usually a bit tricky in Kubernetes, since the hard drives are hooked up to specific nodes.
Even though we only use a single node, we still use longhorn to manage our storage.
It provides a storage class called longhorn-static which you can use to create persistent volumes.
We have a total capacity of 1 TB.
Helm
Helm is a package manager for Kubernetes. It works by using templates to configure installations via a values file. Usually a template will look like this:
apiVersion: apps/v1
kind: Deployment
metadata:
  name:  {{ include "robot.fullname" . }}
  labels:
    {{- include "robot.labels" . | nindent 4 }}
spec:
  replicas: {{ .Values.replicas | int }}
  selector:
    matchLabels:
      {{- include "robot.selectorLabels" . | nindent 6 }}
  template:
    metadata:
      labels:
        {{- include "robot.selectorLabels" . | nindent 8 }}
    spec:
      serviceAccountName: {{ include "robot.serviceAccountName" . }}
      containers:
      - name: {{ .Chart.Name }}
        image: "{{ .Values.image.registry }}/{{ .Values.image.name }}:{{ .Values.image.tag | default .Chart.AppVersion }}"
        imagePullPolicy: {{ .Values.image.pullPolicy }}
        ports:
        {{- with .Values.service.my }}
          - name: {{ .portName | lower }}
            containerPort: {{ .port }}
            protocol: {{ .protocol }}
            {{- end }}
        {{- if .Values.resources }}
        resources:
          {{- toYaml .Values.resources | nindent 10 }}
        {{- end }}
        {{- if .Values.livenessProbe }}
        envFrom:
          - configMapRef:
              name: {{ include "robot.fullname" . }}
        {{- if .Values.env }}
        env:
        {{- range $key, $value := .Values.env }}
          - name: {{ $key }}
            value: {{ tpl $value $ | quote }}
            {{- end }}
        {{- end }}
They are a bit hard to read, but basically they are normal yaml files with placeholders. Everything prefaced
with .values is something coming from the values file. There are some built-in functions like include,
toYaml, tpl and more. Also there are
Fernverwaltung HPC Knoten
Unser Rechenknoten im HPC wird mittels IPMI Fernverwaltet. Um IPMI zu verwenden, müssen wir uns über m02, einen anderen Knoten, einloggen. Danach können wir das ipmitool in der Kommandozeile verwenden. Die Ip-Addressen sind wie folgt:
- goedel-m01: 10.218.112.200
- goedel-m02: 10.218.112.201
Sammlung an Befehlen zum verwalten:
# Status abfragen
ipmitool -U ADMIN -P ag3.GWDG -H 10.218.112.200 -I lanplus power status
# Einschalten
ipmitool -U ADMIN -P ag3.GWDG -H 10.218.112.200 -I lanplus power on
# Ausschalten
ipmitool -U ADMIN -P ag3.GWDG -H 10.218.112.200 -I lanplus power off
# Sensorstatus abfragen (Zeigt Temperaturen, Lüfterdrehzahlen und andere Sensorwerte an.)
ipmitool -U ADMIN -P ag3.GWDG -H 10.218.112.200 -I lanplus sensor
# Stromverbrauch
ipmitool -U ADMIN -P ag3.GWDG -H 10.218.112.200 -I lanplus dcmi power reading