The documentation is in a very early stage.
This is the multi-page printable view of this section. Click here to print.
Documentation
- 1: About Microservice Dungeon 2.0
- 2: Game Concept
- 2.1: What is a Map in MSD?
- 2.2: Robot Actions
- 2.3: Trading (Buying and Selling)
- 2.4: Running a Game
- 2.5: How do Players Interact with the Game?
- 2.6: Glossary
- 3: Architecture Overview
- 3.1: Principles
- 3.2: Architecture Decision Records (ADRs)
- 3.2.1: 0. Emtpy ADR-template
- 3.2.2: 1. Use Markdown Architectural Decision Records
- 3.2.3: Architectural Significance
- 3.3: Dungeon Board Protocols
- 4: Getting Started
- 5: Player Development
- 6: Game Admin Guide
- 6.1: Map Definition
- 7: Technical Admin Guide
- 7.1: Kubernetes
- 7.2: Monitoring
- 7.3: AWS Hosting
- 7.4:
- 7.5:
- 8: API and Service Reference
- 9: Knowledge Base
- 10: Frequently Asked Questions
- 11: How To Contribute to the Microservice Dungeon
1 - About Microservice Dungeon 2.0
An introduction to the Microservice Dungeon: what it is, why it exists, and how it works.
What is the Microservice Dungeon?
The Microservice Dungeon (MSD) is a large-scale, distributed application designed as a game. It looks like a strategy game in space: players control fleets of robots, explore maps of planets and space stations, mine resources, trade, and fight each other. But the real purpose is not the game itself. MSD should be a state-of-the-art microservice landscape:
- Each piece of game logic (robots, map layout & mining, trading, game lifecycle, etc.) is implemented as an independent microservice.
- Communication happens through events, intents, and asynchronous messaging, very similar to real-world e-commerce or logistics platforms.
- Players act as internal services that interact with the MSD core services through APIs and events.
In short: MSD is a sandbox where you can experience the challenges of modern software architecture in a safe, playful, but technically realistic environment.
Why does the Microservice Dungeon exist?
Modern software rarely comes as a single monolithic application. Instead, companies run large, distributed systems with dozens or hundreds of microservices. These systems are powerful, but also fragile:
- What happens if one service goes down?
- How do we ensure consistency across multiple databases?
- How do we handle thousands of events per second?
- How do we scale up and still keep everything observable and secure?
The MSD is designed to simulate these challenges in a controlled environment. It’s here to help people learn and experiment with Microservices:
- For students, it’s a way to learn by coding, deploying, debugging, and experimenting.
- For developers in workshops, it’s a way to experience microservice architectures under realistic conditions.
- For researchers, it’s a platform to study scalability, resilience, observability, and architectural patterns in a controlled but non-trivial environment.
Principles that guide the MSD
-
As real as possible: MSD resembles a productive microservice landscape (e.g. e-commerce), not just a toy project. Game-specific features are simplified if they conflict with architectural realism.
-
Fun matters: Learning is easier if it’s fun. MSD is designed as a game with competition and exploration, so participants stay motivated.
-
Security with pragmatism
- Outside participants = zero trust.
- Inside a course = pragmatic trust (errors are mistakes, not attacks).
- Always apply basic security rules (e.g. DB passwords, API keys).
-
Sustainable core, experimental edges
- The core services follow strict guidelines: mainstream technologies, strong guardrails, consistent architecture.
- On top, students and researchers are free to explore new stacks and ideas.
- Sandbox experiments must be documented, but don’t need to be merged into the main system.
-
Simplicity where possible, complexity where needed: Architecture should stay as simple as possible, but not simpler than what real-world systems require.
How does the game work?
The game simulates a 2D universe made of planets, space stations, and hazards like black holes.
- Robots are the main actors. Each player controls robots that can move, mine, fight, and trade.
- Planets provide resources, which robots can mine.
- Space Stations are hubs for spawning robots, trading goods, buying upgrades, and repairing damage.
- Resources (e.g. Bio Matter, Plasma Cores, Dark Matter) can be mined and sold for money.
- Trading lets players buy vouchers for robots or upgrades.
- Fighting allows players to attack each other’s robots for rewards.
You can find the detailed game rules here.
2 - Game Concept
A description how the game that is played in the Microservice Dungeon works - its rules, mechanics, and goals.
The following section provides an overview of the overall concepts of the Microservice Dungeon.
tl;dr
The Microservice Dungeon (short MSD) is a game where players compete against each other to achieve the highest possible score. Each player service controls a swarm of robots. Robots move across the game board, mine resources, purchase upgrades, and battle each other. All of these actions earn points for the player.
The notable difference to a “regular” multiplayer game is that the players are not persons but microservices, implemented by a developer (or developer team). The robot swarm is usually not controlled manually1 but by an algorithm implemented in the player service.
The map is a 2-dimensional grid of planets. Resources are distributed across it. They can be mined, picked up by robots, and sold at space stations. Space stations are also placed on the map and serve as a kind of home base and safe zone. There, robots can sell resources, get repairs, and purchase upgrades. Combat is not allowed on space stations.
Each player has a money account, and starts the game with an initial amount of money. This can be used to purchase new robots. New robots always start at the player’s allocated space station. Selling resources and killing robots increases a player’s account balance. With more money, a player can buy additional robots or upgrade existing ones.
In the next subsections, we will look deeper into the rules for several aspects of the game.
-
Although manual control is possible, it is not practical in real life. The robot swarms are just too large. A couple of hundred robots is pretty normal in a long-running game. ↩︎
2.1 - What is a Map in MSD?
A map is basically a 2-dimensional grid, structured like below. Each tile can be of a specific type, and can be identified (relative to the overall map) by an integer tuple, starting at (0,0) in the lower left corner.

Robots can move over the map in the directions N, NE, E, SE, S, SW, W, and NW (see below). The map boundaries limit the movements. I.e. from tile (0,2) you can only move in northern, eastern, and southern direction, but not to the west.


Summarized, the tiles in a 2-dimensional MSD map follow this schema1, which is then explained in the subsequent sections.
map = { tile }
tile = planet | void
planet = space station | (resource) mine | black hole | empty
resource mine = bio matter | cryo gas | dark matter | ion dust | plasma cores
Planets and Voids
The tiles of a map represent either be a planet or a void. Planets are connected to each other by hyperlanes. Robots can use these hyperlanes to travel from one planet to the next. Since voids do not have hyperlanes, they are effectively barriers for robot movement. Robots need to navigate around them, traveling from one planet to the next.

We will create an example map, step by step, to illustrate the map concepts. The image above shows our example map with some barriers on it, on the following tiles:
- (1,1)…(1,4)
- (3,6)…(3,7)
- (7,4)
- (4,3)
- (7,0)…(7,1)
Gravity Areas
Traveling hyperlanes requires energy. The robots have a limited supply of energy, which they need to recharge eventually. An MSD map can have areas with different levels of gravity. Depending on that level of gravity, passing a hyperlane from one planet to the next requires a certain amount of energy (reference point is always the target planet).

The above image shows our map with a “typical” configuration of increasing gravity towards the center of the map. Gravity comes in three levels:
| Gravity Level | Energy needed (default) |
|---|---|
| LIGHT | 1 |
| MEDIUM | 2 |
| INTENSE | 3 |
Please be aware that the energy needed per level might be configured differently than the default for each individual game. So you cannot rely on these values to be hardcoded.
Planet Types
Planets can have a resource mine or a space station, they can be a black hole, or they are just empty. (For simplicity reasons, a planet - in the current version of this game - can only be one these things. So it cannot be a resource mine and a space station at the same time. Neither will it have more than one resource mine.)
Any number of robots - both allied and enemy - can occupy the same planet. The image below shows our example map “ready to play”.

Space Stations
A space station is located on a planet, and serves as both a trading outpost and a safe zone for robots. Combat is not allowed on space stations. Robots can use space stations to trade, purchase upgrades, and repair themselves. Some, but not all, space stations are able to spawn new robots. (Those who are able to spawn robots are colored in blue in the sample map above. The others are just trading posts.)
Each player is assigned to a space station (of the type that can spawn robots, i.e. of the “blue” type), so that new robots for the player fleet will always spawn at the same location. Depending on the number of space stations, several players may share the same station.
Trading and upgrading is only possible at space stations. This means that a robot with its cargo area full of mined resources must travel to a space station in order to sell the resources, and to get upgrades. Space stations are neutral, and accessible to all robots from all players. I.e. robots can travel to any space station, not only the one they spawned from.
Resource Mines
Some planets contain mines for resource extraction. Depending on the map type, they can randomly distributed across the map, or deliberately located only in certain map parts. Each mine produces a single type of resource, and will continue producing until it is depleted. Each planet can have at most one resource mine.
There are five types of resources, ranked from most common to rarest (hint: the further back the initial letter is in the alphabet, the more valuable the resource.)
- Bio Matter
- Cryo Gas
- Dark Matter
- Ion Dust, and
- Plasma Cores
Our example map above shows a fairly small, but still typical distribution of resources. Bio matter can be found in 8 locations, cryo gas in 5, dark matter in 3, and the most valuable ion dust and plasma cores in 2, respectively. The numbers below the acronyms in the above map describe the available units of the resource.
Once a mine is depleted, it is closed and disappears from the map. Depending on the particular map type definition, new resources may be discovered once the existing units are partially or fully exhausted. This discovery of new resources will not necessarily be at the same location as the old mine.
Mining takes time. A player service can ask for the mining process to start for a dedicated robot. After a short delay, the resource becomes available on the planet ready to be picked up (by that particular robot). This will happen automatically, assuming the robot is capable of doing so. Robots are by default able to transport the least valuable resource in their cargo rooms (bio matter). For all other resources, they need to be upgraded.
All resources are volatile substances. If the robot is not capable of holding the mined resource in its cargo area, they remain at mine and evaporate - i.e. they are lost to both the player who initiated the mining, and to all other players.
Black Holes
Black holes can be traversed by robots, but entering a black hole will - with a certain probability - lead to the robot’s destruction. The default likelihood for destruction is 50%, but this might be configured differently in a particular map.
Map Configuration
The map for an MSD game is configurable. There are a couple of standard map types, and it is possible to add other types as well for dedicated games. Please refer to the map definition guide for an in-depth explanation of how to configure your own map for an MSD game.
-
For the afficionados - this is supposed to be a dumbed-down Extended Backus-Naur Form (EBNF) :-) ↩︎
2.2 - Robot Actions
(TBD: refine and discuss the robot actions in detail)
Every player controls a swarm of robots to compete against other players. A robot is exactly what you’d expect — a mechanical unit with health points, energy for performing actions, having the ability to move, engage in combat, and upgrade itself through the purchase of upgrades.
Buying a Robot
Players can purchase new robots at any time during the game using their money. Newly bought robots spawn instantly at a space station dedicated to a player.
Action-Cooldown / -Queue [to be discussed]
After performing an action, a robot requires a short pause before executing the next one. This cooldown applies regardless of whether the action was successful or not. As a result, robots may not respond immediately to new commands.
Robots queue up actions and execute them in order. Players should carefully plan the number of commands they issue, as each action has a different cooldown duration. For instance, attacking another robot has a shorter cooldown than moving. Upgrades are available to reduce cooldown durations.
External actions do not trigger a cooldown, such as applying upgrades or collecting resources.
This mechanism is similar to the mining system, with one key difference: Robots execute actions immediately, followed by a cooldown. Mines require processing time before yielding resources.
Energy
Robots have both health points and energy. Some actions consume energy, and if a robot runs out of energy, it pauses and cannot perform further actions until it has recharged enough energy.
Energy automatically regenerates over time. This process is increased on space stations.
Repairing
Robots automatically restore health points over time on space stations. No action required.
Movement
Robots can move horizontally, vertically, and diagonally across the map. Each movement consumes energy and triggers a cooldown. To track enemy robot positions, players must listen to the movements of other robots.
Fighting [to be discussed]
Robots can attack other robots. Attacks consume energy and trigger a cooldown, regardless of whether the attack is successful or not. To attack, a robot must have enough energy and be in range of the target. Caution, friendly fire is possible!
When an enemy robot is destroyed, the attacker becomes stronger, receives a financial reward and collects the destroyed robot’s resources, regardless of its position.
Mining [to be discuessed]
To extract resources, a player starts the mining process at a specific mine. If the player’s robot is on the same planet, it will automatically collect the resources once the mining process finishes.
Starting the mining process consumes energy and triggers a cooldown - even if the mining fails or the robot is elsewhere. Collecting mined resources does not consume energy nor does it trigger a cooldown. But in order to work, the robot must be present on the planet when the mining completes.
2.3 - Trading (Buying and Selling)
(TBD: Explain the voucher concept, and structure the documentation a little bit more.)
Trading (buying and selling) is an essential part of the MSD and takes place at space stations. Players can sell mined resources, purchase new robots, and upgrade existing ones — all in exchange for in-game currency.
Selling Resources
Resources collected by robots can be sold at any space station. To initiate a sale, a robot carrying resources must be present at a space station. Once the sale is started, all resources on that robot are sold to the market, and the player receives the corresponding amount of money in their account.
The value of each resource depends on its rarity. Currently, prices are hardcoded and fix, but may fluctuate (based on market demand) in the future. In that case, if a large volume of a specific resource is sold in a short time frame, its market price will drop. Players should consider these fluctuations when planning their mining and trading strategies.
Buying Robots
Players can purchase additional robots at any time during the game. To do so, they must have sufficient funds in their account. New robots are delivered to a space station. If the player does not specify a station, a random one will be chosen.
Purchases are made through robot vouchers, which define how many robots will be spawned. Vouchers are immediately redeemed upon purchase.
Upgrading Robots
Robots can be upgraded to enhance their capabilities. Upgrades can improve:
- Carrying capacity
- Combat strength
- Attack damage
- Health points
- Health point regeneration speed
- Energy
- Energy regeneration speed
- Energy capacity
- Cooldown time
Upgrades are purchased in the form of vouchers, which are tied to a specific robot. To apply an upgrade, the robot must be located at a space station. If the robot is not at a station when the upgrade is purchased, the voucher will be discarded without refund, and the player will be notified.
Debt
Player cannot go into debt. If they do not have enough money to make a purchase, the transaction will be declined and an error message will be published.
2.4 - Running a Game
The MSD is played in individual games. To participate, players register once and join an open game. This is possible even after the game has started, but late joiners do not receive any compensation for missed playtime. The number of participants is limited and defined at game creation.
Game Flow
When a game starts, each player is assigned to a space station on the map. New robots for the player’s fleet will always spawn at this location. Depending on the number of space stations, several players may share the same station.
Win Condition
A game ends either when an administrator intervenes, or when the predefined game time runs out. The player with the most points wins the game, though there are several categories to score a ranking.
Once a player has joined a game, they cannot leave. If they lose all their robots and have no funds left to purchase new ones, their game ends.
TBD: explain how a player can participate in a game, how a game is started, monitored and ended.
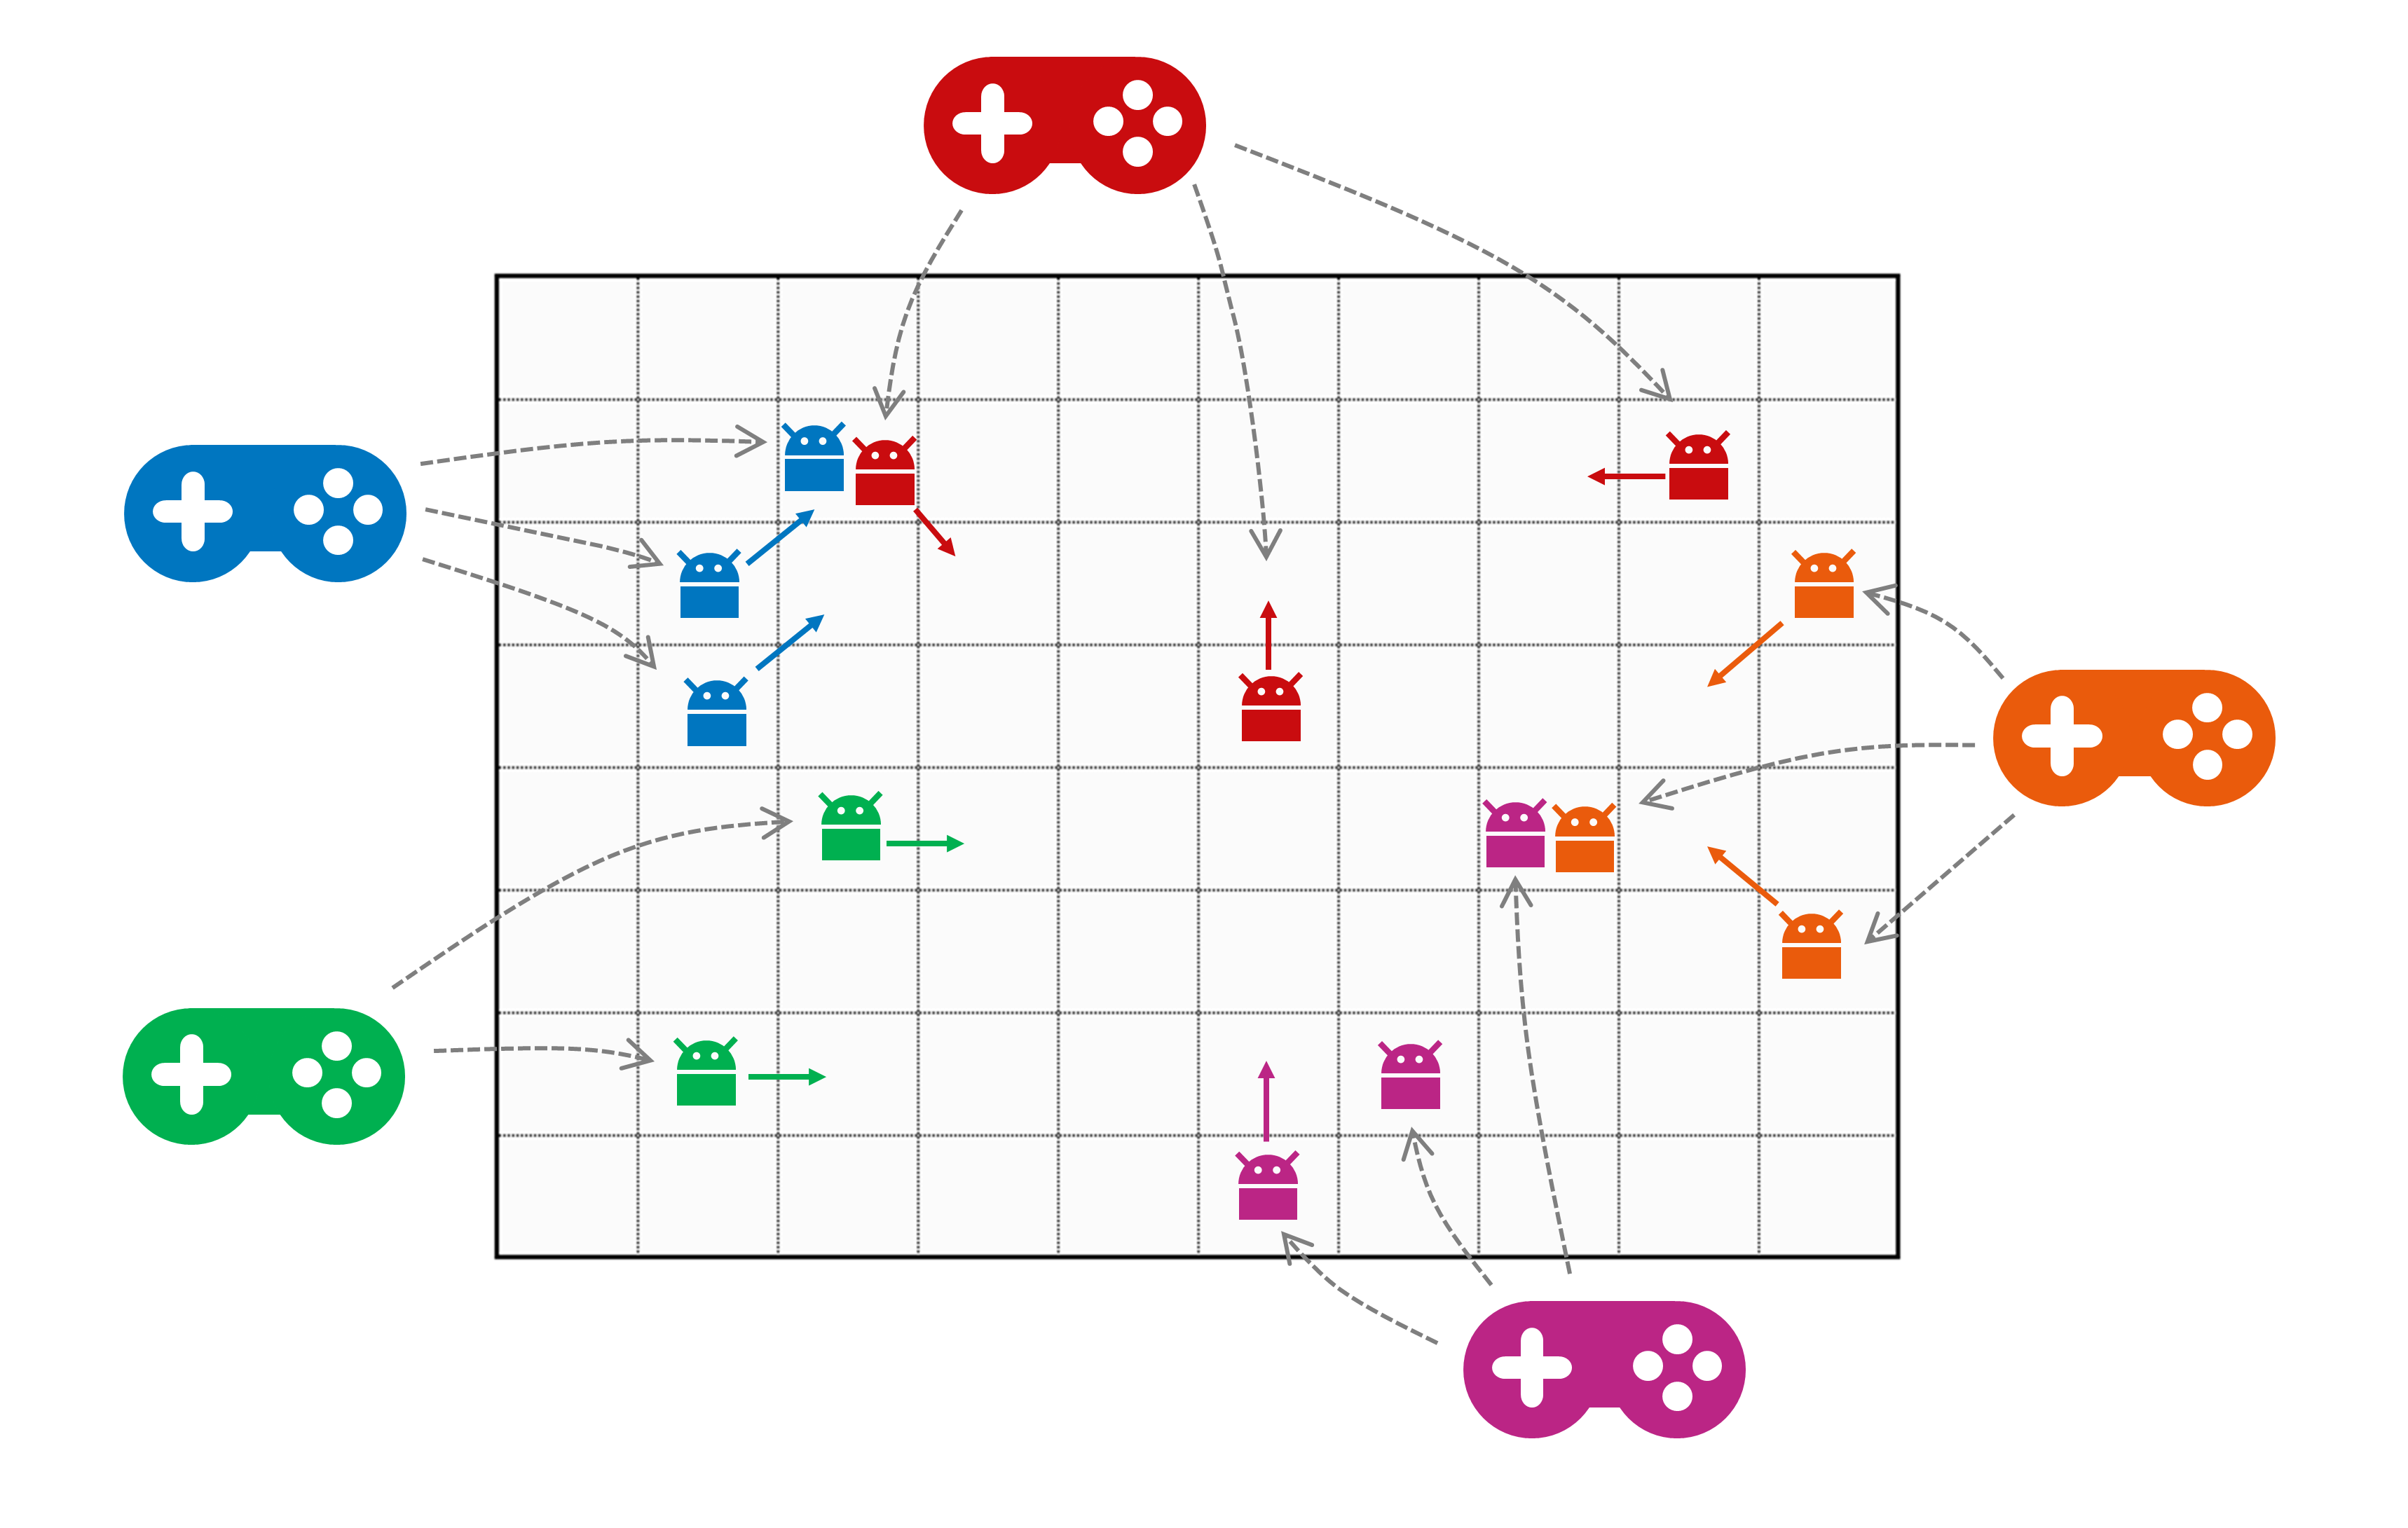
2.5 - How do Players Interact with the Game?
(TBD: explain how a player interacts with the game, without getting too technical here. Just explain the principles and provide links to the more technical sections.)
- what is a player service?
- how does one interact with the game
- flow chart diagrams?
- code of conduct / security
2.6 - Glossary
Glossary of important terms used in the Microservice Dungeon.
Entities
| Domain | Owner | Description |
|---|---|---|
| Black hole | TODO | |
| Cooldown | TODO | |
| Energy | TODO | |
| Game | TODO | |
| Life points | TODO | |
| Map | TODO | |
| Mine | TODO | |
| Planet | TODO | |
| Player | TODO | |
| Resource | TODO | |
| Robot | TODO | |
| Space station | TODO | |
| Upgrade | TODO | |
| Void | TODO |
Actions
| Domain | Description |
|---|---|
| Mining | TODO |
3 - Architecture Overview
The overall architecture of the Microservice Dungeon, its main building blocks and their interactions.
For service boundaries & ownership see the dedicated service pages below.
(TBD: provide an architecture overview diagram here, and a high-level motivation for the chosen architecture.)
3.1 - Principles
The global and technical design principles followed in the Microservice Dungeon.
Global Design Principles
In MSD, we maintain a couple of global design principles, supposed to help in decision making. Every time we arrive at some priorization decision, these global principles should help deciding the issue. Therefore, this is a living document.
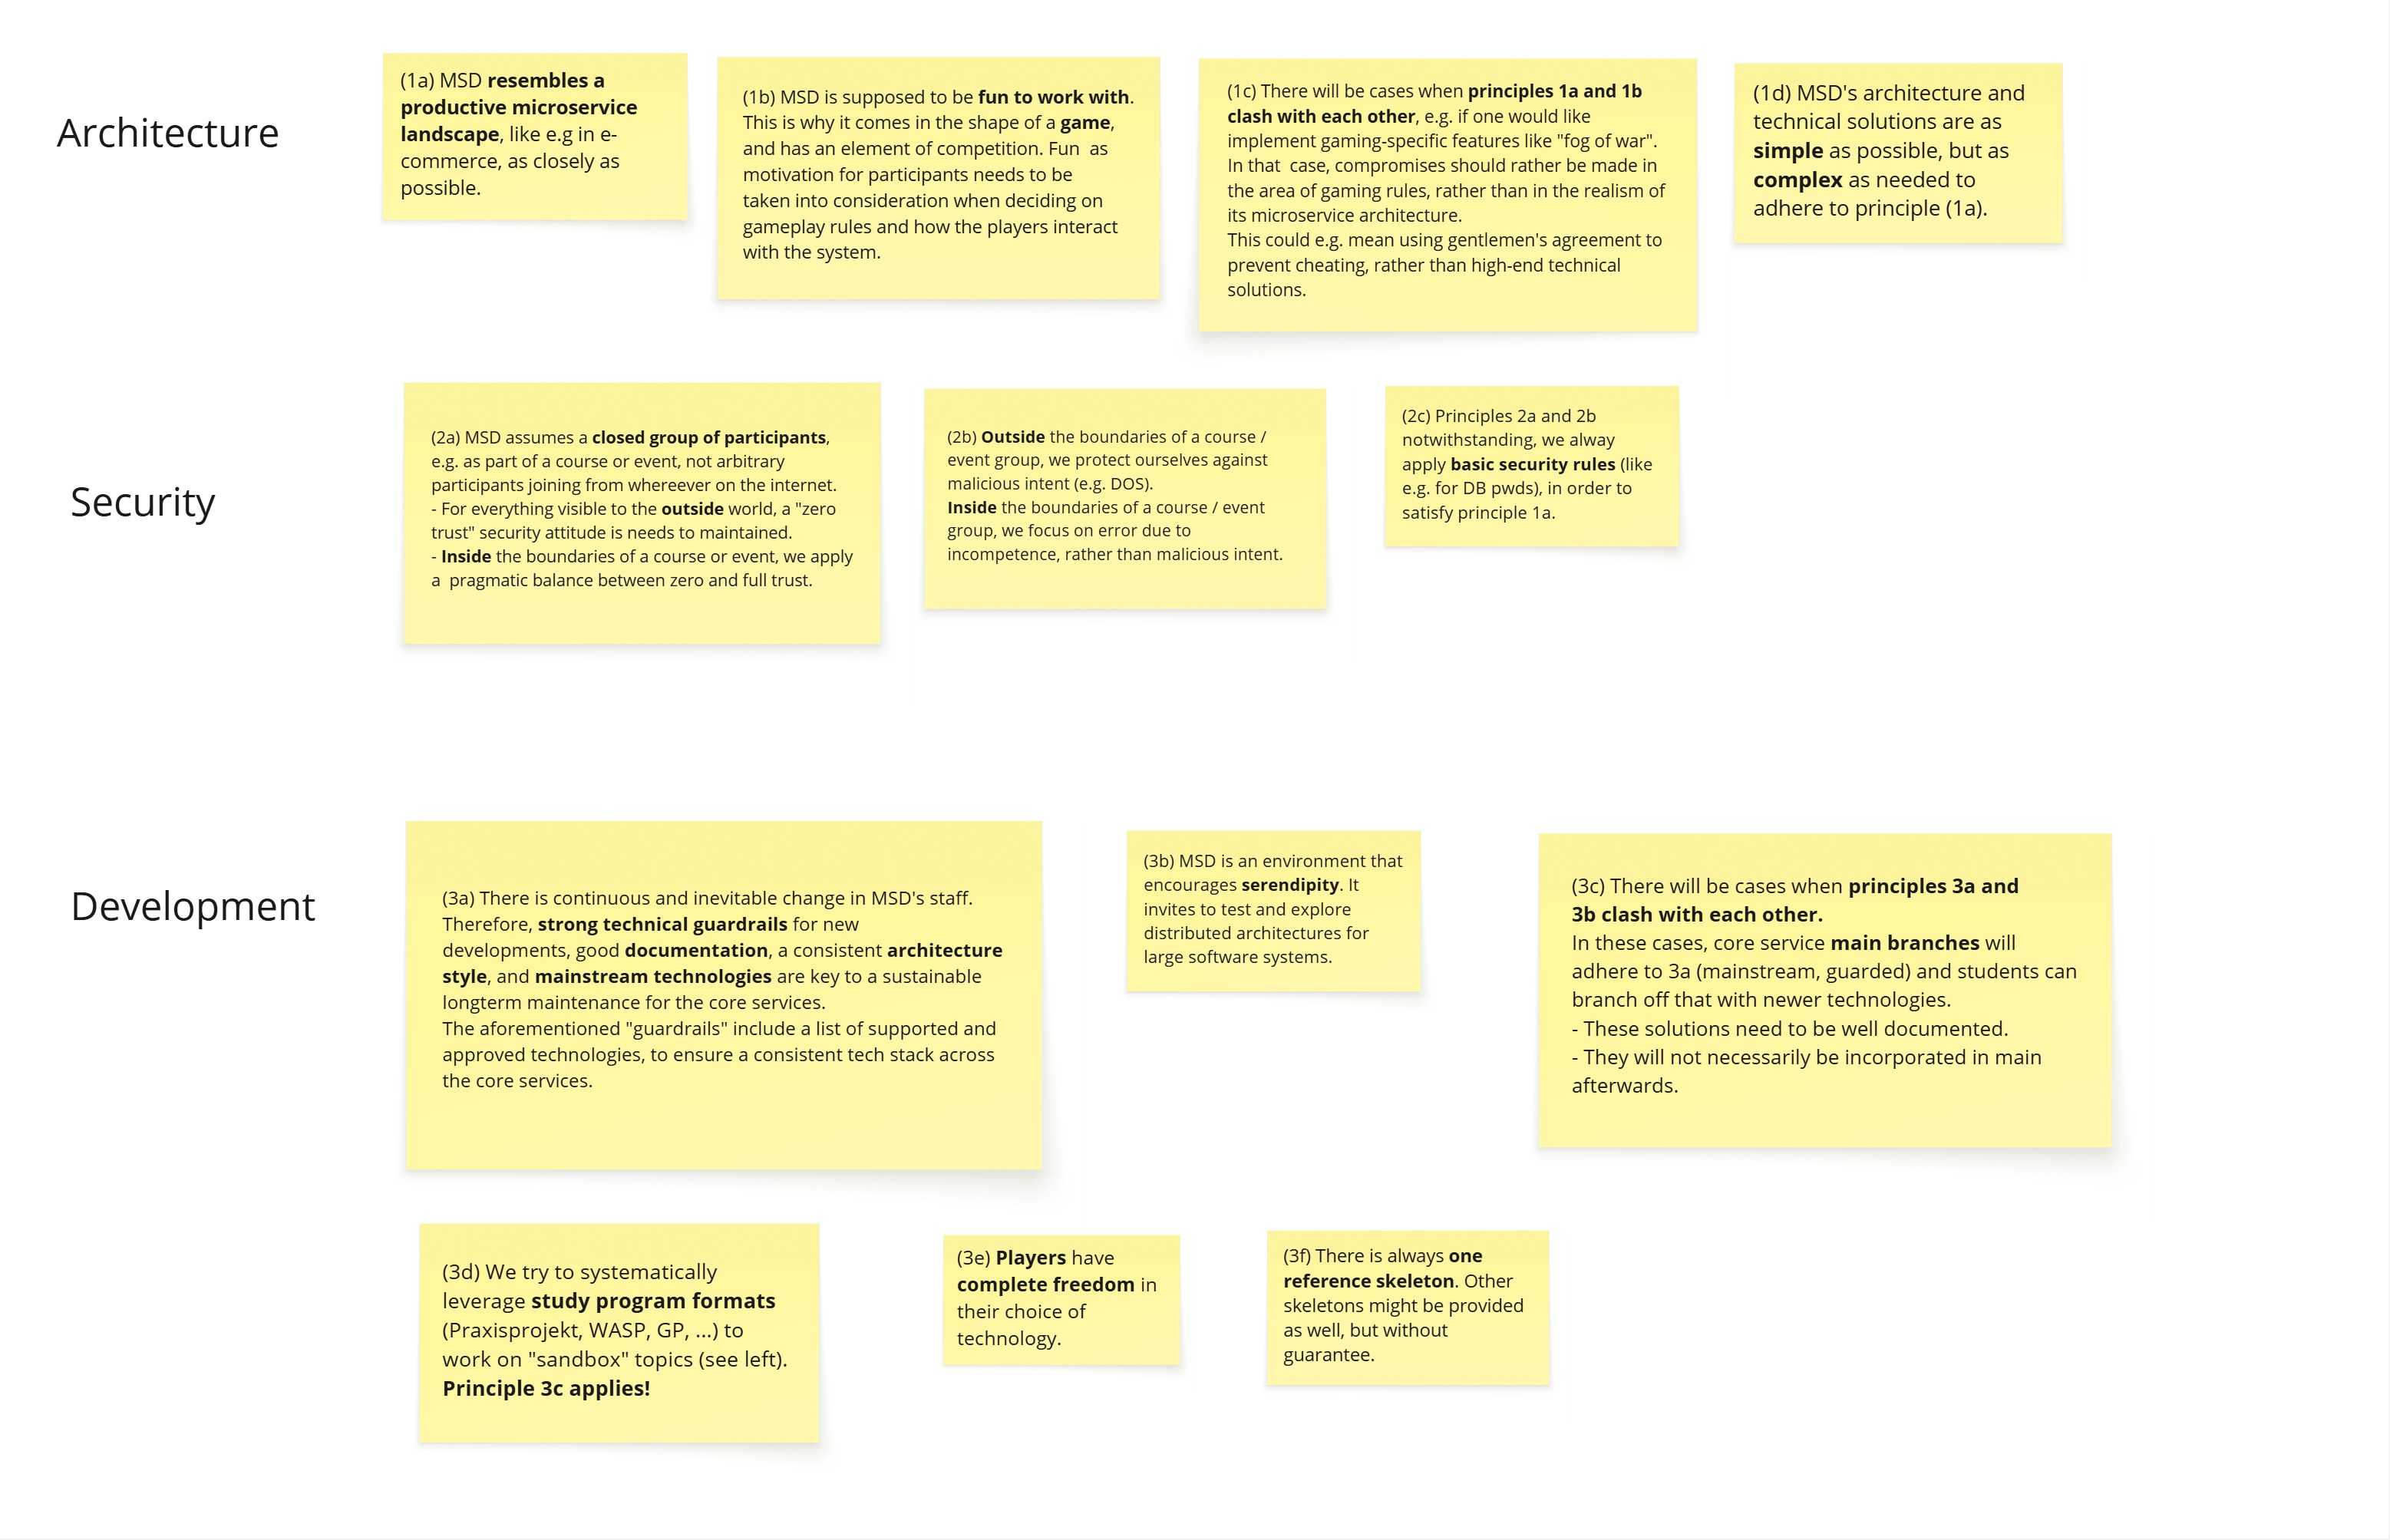
Technical Principles
(tbd - just keywords so far)
- JSON as configuration format (so that it can be reused in REST APIs)
3.2 - Architecture Decision Records (ADRs)
This section contains all Architecture Decision Records made within the Project. You can either create them manually, by copying another file and naming it accordingly or use this fork of adr-tools for hugo
3.2.1 - 0. Emtpy ADR-template
- Status: proposed
- Deciders: [list everyone involved in the decision]
- Date: 2026-01-05
Technical Story: [description | ticket/issue URL]
Context and Problem Statement
[Describe the context and problem statement, e.g., in free form using two to three sentences. You may want to articulate the problem in form of a question.]
Decision Drivers
- [driver 1, e.g., a force, facing concern, …]
- [driver 2, e.g., a force, facing concern, …]
- …
Considered Options
- [option 1]
- [option 2]
- [option 3]
- …
Decision Outcome
Chosen option: “[option 1]”, because [justification. e.g., only option, which meets k.o. criterion decision driver | which resolves force force | … | comes out best (see below)].
Positive Consequences:
- [e.g., improvement of quality attribute satisfaction, follow-up decisions required, …]
- …
Negative consequences:
- [e.g., compromising quality attribute, follow-up decisions required, …]
- …
Pros and Cons of the Options
[option 1]
[example | description | pointer to more information | …]
- Good, because [argument a]
- Good, because [argument b]
- Bad, because [argument c]
- …
[option 2]
[example | description | pointer to more information | …]
- Good, because [argument a]
- Good, because [argument b]
- Bad, because [argument c]
- …
[option 3]
[example | description | pointer to more information | …]
- Good, because [argument a]
- Good, because [argument b]
- Bad, because [argument c]
- …
Additional Information
Here are some questions to maybe assess the architectural significance of the decision. Try to avoid defining every little thing as an ADR.
- The requirement is directly associated with high business value (benefit vs. cost) or business risk.
- The requirement is a concern of a particularly important stakeholder such as the project sponsor or an external compliance auditor.
- The requirement includes runtime Quality-of-Service (QoS) characteristics (such as performance needs) that deviate from those already satisfied by the evolving architecture substantially.
- The requirement causes new or deals with one or more existing external dependencies that might have unpredictable, unreliable and/or uncontrollable behavior.
- The requirement has a cross-cutting nature and therefore affects multiple parts of the system and their interactions; it may even have system-wide impact, short term and/or in the long run (examples: security, monitoring).
- The requirement has a First-of-a-Kind (FOAK) character: For instance, this team has never built a component or subsystem that satisfies this particular requirement before.
- The requirement has been troublesome and caused critical situations, budget overruns or client dissatisfaction on a previous project in a similar context.
Links
- [Link type] [Link to ADR]
You can add links via the adr tool e.g.:
adr link 12 Amends 10 "Amended by"
or while creating a new one:
adr new -l "10:Amends:Amended by" Use Mysql as a Database.
The other option is to use manual linking like this:
[ADR0001]({{< relref "docs/architecture/adr/0000-empty-adr-template.md" >}}) produces:
ADR0001
Or use normal markdown links (also supports relative linking): [\<Link Name\>]\(docs/architecture/adr/0000-empty-adr-template.md) - Produces: Link Name
…
3.2.2 - 1. Use Markdown Architectural Decision Records
- Status: proposed
- Date: 2026-01-05
Context and Problem Statement
We want to record architectural decisions made in this project. Which format and structure should these records follow?
Decision Drivers
- Low barrier of entry - since the act of documenting is always cumbersome, the format should not burden you any more than it needs to. E.g. we do not necessarily need an 11-Point Document for each and every decision.
- Overview - an ADR should provide a list of considered options and why you chose one of them while discarding others.
- Tool support - there is a strong need to integrate ADRs with our central (hugo based) documentation, as natively as possible. Previous projects have shown that scattering relevant documentation leads to a lot of confusion.
Considered Options
- MADR 2.1.0 - The Markdown Architectural Decision Records
- Michael Nygard’s template - The first incarnation of the term “ADR”
- Sustainable Architectural Decisions - The Y-Statements
- Other templates listed at https://github.com/joelparkerhenderson/architecture_decision_record
- Formless - No conventions for file format and structure
Decision Outcome
Chosen option: “MADR 2.1.0”, because
- Implicit assumptions should be made explicit. Design documentation is important to enable people understanding the decisions later on. See also A rational design process: How and why to fake it.
- The MADR format is lean and fits our development style.
- The MADR structure is comprehensible and facilitates usage & maintenance.
- The MADR project is vivid.
- Version 2.1.0 is the latest one available when starting to document ADRs.
Pros and Cons of the Options
MADR
(This whole Document is an Example)
- Good, because a few mandatory concise fields
- Good, because optional fields provide more information about reasoning and weighing different options
- Good, allows for linking to different ADRs
Y-Statement
In the context of capturing architecture decisions, facing tedious verbosity, scattered documentation and knowledge drain from people leaving the project, we decided to implement ADRs using the MADR template and neglected other formats like Y-Statement, Nygard and similar to achieve a simple, lightweight and modular approach to capturing ADs, accepting the fewer guardrails but more verbosity than y-statement, because our decisions are not overly complex and decided within days-weeks instead of months but still need thorough consideration of multiple options in a structured manner.
- Good, because it results in brief ADRs
- Good, because it allows capturing existing decisions rather quickly
- Bad, because options are not considered in depth
- Bad, because condensing decisions this much requires more thought, not less
- Bad, because it lacks information for future readers that are new to the project
NygardADR
- Bad, few fields for weighing options
- Bad, ambiguous fields might lead to vastly different focal points when making decisions
Links
You can add links via the adr tool e.g.:
adr link 1 Amends 0 "Amended by"
or while creating a new one:
adr new -l "0:Amends:Amended by" Use Markdown Architectural Decision Records.
The other option is to use manual linking like this:
[ADR0001]({{< relref "docs/architecture/adr/0000-empty-adr-template.md" >}}) produces:
ADR0001
Or use normal Markdown links (also supports relative linking): [\<Link Name\>]\(docs/architecture/adr/0000-empty-adr-template.md) - Produces: Link Name
3.2.3 - Architectural Significance
How do we decide on which decisions we need to capture in an Architectural Decision Record (ADR)? O. Zimmermann wrote an article proposing the following guiding principles:
- The requirement is directly associated with high business value (benefit vs. cost) or business risk.
- The requirement is a concern of a particularly important stakeholder such as the project sponsor or an external compliance auditor.
- The requirement includes runtime Quality-of-Service (QoS) characteristics (such as performance needs) that deviate from those already satisfied by the evolving architecture substantially.
- The requirement causes new or deals with one or more existing external dependencies that might have unpredictable, unreliable and/or uncontrollable behavior.
- The requirement has a cross-cutting nature and therefore affects multiple parts of the system and their interactions; it may even have system-wide impact, short term and/or in the long run (examples: security, monitoring).
- The requirement has a First-of-a-Kind (FOAK) character: For instance, this team has never built a component or subsystem that satisfies this particular requirement before.
- The requirement has been troublesome and caused critical situations, budget overruns or client dissatisfaction on a previous project in a similar context.
Translating that to our case is a bit tricky but works for a lot of things:
- The Decision is directly associated with goals relating to the projects success (student and professional workshops, demonstrators, development projects). E.g: How do we document and publish the API for our core services?
- The particularly important stakeholder is only partly relevant
- QoS Characteristics are also mostly arbitrary, but play an important role for the local dev env and when actually scaling out.
- The Decision introduces or deals with external dependencies - these are mostly in the form of code Libraries and tooling. E.g. Which tools do we use to deploy our infrastructure? (Terraform, Ansible, Puppet, Chef, etc.) As in our case, external dependencies also mean knowledge that has to be acquired in order to maintain the system.
- The Decision has a cross-cutting nature and therefore affects multiple parts of the system and their interactions; it may even have system-wide impact, short term and/or in the long run (examples: security, monitoring, event formats, tooling).
- FOAK is quite common in our case, as a lot of this is new to some of us. Nevertheless, an important indicator.
- The decision has been troublesome and caused intensive discussions before.
3.3 - Dungeon Board Protocols
(TBD: move the Dungeon Board Protocols from the admin wiki to here)
4 - Getting Started
A quick guide to get started with the Microservice Dungeon, run a sample game and explore the basics. Somehow the “Hello World” of the MSD.
(TBD: write a getting started guide here …)
- how to access the MSD on production and run it locally
- the idea is for the viewer to see something before diving deeper
- Goal: you don’t develop anything yet, but run the skeleton player / ready-made player in a sample game
- List the preconditions (tools to install, accounts to create etc.)
- “hello world” tutorial
- Local Development Setup, from a player developer perspective
5 - Player Development
Describes how to develop custom players for the Microservice Dungeon.
(TDB)
Goal: you start developing your own player, either based on the skeleton or from scratch.
-
everything a player needs to know in order to get started
-
how to develop a player
- Skeleton reference
- where to find the APIs (AsyncAPI)
-
how gitlab is structured
-
service reference documentation
- where do I find the event documentation
-
small guidance on how to get started
-
local setup + debugging
-
development tips
-
build + deploy
*
* how to develop a player
  * Skeleton reference
  * where to find the APIs (AsyncAPI)
6 - Game Admin Guide
Describes how to prepare, start, run, monitor, and end a game in the Microservice Dungeon. Including a detailed overview of the game configuration options, e.g. for custom maps.
(TODO - more content. This section of the documentation describes how to prepare, start, run, monitor, and end a game. It addresses more the “game admin” than the “technical admin”.)
6.1 - Map Definition
In Microservice Dungeon, the maps are custom-created. A game can be started based on a specific map type. This section explains how to specify such a map type.
There is a REST API that can be used to create a new map type (TODO provide link to OpenApi). Basically, a map type is described by a complex JSON structure. This structure contains of the following major parts:
- Base attributes (name, description, dimensions)
- Gravity zones
- Tile type zones (with planets or voids), determining the basic map structure
- Planet type distribution zones (space stations, black holes, mines)
- Replenishment zones (to define where resources will be replenished during the game)

The above simplified domain model shows the five components of a map definition. The actual JSON syntax will be shown by example, based on three sample maps1, in the coming subsections.
Base Attributes (1)
For each map type, the map dimension is given as the coordinate of the top-right corner. As explained in the Game Rules section, the map coordinate in the left bottom corner is (0,0), and x-/y-coordinates increase to the top and to the right. In addition to that, a map type has a distinctive name, and a brief description that can be used in a UI for selecting it as base for a game.
Zone Definitions
All four components of a map definition basically consist of ordered lists of map zones. A map zone can cover a part of the map, or the complete map. Each zone is stacked on top of the previous zones in the list. If zones overlap, then the top zone overrides the settings on those below.

A zone can be one of three types:
- tile
- rectangle
- ring
Tile Zone

A single tile is just defined by its coordinate.
Rectangle Zone

A rectangle zone is specified by its lower-left and its upper-right corner coordinate (that would be (2,2) and (6,4) in the above example).
Ring Zone

A ring zone uses the fact that a rectangular map can be decomposed into rings of tiles, starting with ring no. 0 at the map edge (see above). A ring zone is therefore defined by its “from” and “to” ring indices (0…1 in our example).
Gravity Zones (2)
The first thing to be defined for a map are the gravity zones. This is an ordered list of the value objects as depicted below.

Note that this section can also be incomplete or empty. Each map tile that hasn’t been specified is assumed to have a medium gravity level of 2. The gravity level is a simple domain primitive, with constants 1 … 3.
Tile Type Zones (3)
This section of a map definition determines the basic map structure. It is an ordered list of zones containing planets, and zones containing voids.

This section, too, can be incomplete or empty. The default for unspecified map tiles is void.
Planet Type Distribution Zones (4)
This section of the map definition determines the distribution of space stations, black holes, and resource mines.

The type attribute for the PlanetUsageType is a simple enum (space_station | space_station_no_spawning |
black_hole | mine). There is no type for empty planets. Planets are all considered empty unless a
usage is assigned to them. The distribution is done randomly within the given zone. (If you want to place
a certain usage, for example a space station, to a specific location on the map instead of a random location,
you need to use a tile zone.)
If the assigned usage is mine, then its resource type also needs to be specified in the attribute resource.
The is also a domain primitive in the shape of a simple enum (bio_matter | cryo_gas | dark_matter | ion_dust | plasma_cores).
The ordered list of planet type distribution zones can be empty, but the overall map needs to have at least one space station capable of spawning robots. If the list of distribution zones does not contain such a space station, one will be assigned randomly at the end of processing the planet types.
Specifying the number of usages to be assigned
The number of usages (e.g. space stations) that should
be assigned to planets in the given zone is defined by the attribute count. Its type CountType allows to
specify either
- a fixed number (e.g. 5 space stations), or
- a number relative to the number of empty planets in the zone (e.g. 10% of the empty planets in the zone to be assigned a space station), or
- a number relative to the total number of players in the game (e.g. 1 space stations per player, plus 2 extra).
For simplicity reasons, count type is a string allowing a simple expression with predefined keywords like this:
5empty_planets * 0.1players + 2
More formally, the syntax is defined as follows:
CountType = FixedCount | EmptyPlanetsCount | PlayersCount;
FixedCount = <integer>;
EmptyPlanetsCount = "empty_planets" Operator <float>;
PlayersCount = "players" Operator <float>;
Operator = "+" | "-" | "*" | "/";
Multiple distribution zones can overlay each other. Note that the empty planets meta counter always refers
to the amount of planets still empty after having applied the previous distribution zones. So, if you have a rectangle
with 12 planets, and 5 of them have already been assigned in zones specified prior to this zone, then
empty_planets amounts to 7.
Results of an Operator expression are always rounded up to the next full integer. Evidently there are illegal
expressions: For instance empty_planets + 2 is evidently unfulfillable and will be rejected as a faulty specification.
Replenishment Zones (5)
Replenishment zones are used to define where resources will be replenished during the game, when exhausted by mining. The ordered list of replenishment zones forms the last section of a map definition. This section can be empty or incomplete.

A replenishment zone always relates to all the resource mines within that zone. The mines can be filtered by
specifying the attribute onlyForResource. If this attribute is omitted or null, then all resource mines in the zone,
regardless of their resource, are affected by the replenishment. If the attribute is set to a specific resource type,
then only those mines of that resource type are affected. The resource types are the same as in
planet type distribution zones,
namely bio_matter | cryo_gas | dark_matter | ion_dust | plasma_cores.
The replenishment itself is defined by two attributes:
threshold: This is an integer value defining a stock level in the resource mine. When the stock level of the mine is equal to or below this threshold, then the replenishment is triggered.replenishBy: This is an integer value defining how many resource units are added to the stock of the mine when the replenishment is triggered.
The attribute location can have the values existing or new.
existing: The replenishment is done at the resource mine where the stock level is at or below the threshold. The mine continues to exist, just its stock is increased by thereplenishByvalue.new: The mine at the location where the stock level is at or below the threshold is closed (removed). A new resource mine is created at a random empty planet within the same zone, with an initial stock equal to thereplenishByvalue. With this option, resource mines “move around” the map during the game.
If no replenishment zones are specified, then the resources on the map are just decreasing and will not be replenished during the game.
-
See the next sections (click the Next link below). These example maps can also be found in the test code for the Map Service. ↩︎
6.1.1 - Small Map
The Small Map is a “MSD map in a nutshell”. It just has 70 (10 x 7) tiles, suitable only for a small number of players (<= 5), otherwise the map will be too crowded to provide much fun.
(tbd: detailed description)
6.1.2 - Maze
(todo: description of the map)
6.1.3 - Arena
(todo: description of the map)
7 - Technical Admin Guide
A collection of all topics related to operations of the Microservice Dungeon.
A collection of all topics related to operations.
7.1 - Kubernetes
7.2 - Monitoring
7.3 - AWS Hosting
7.4 -
Local Dev Environment
The local dev environment is a minimal setup based on Docker Compose for running the Microservice Dungeon locally.
Use cases include the continued development of the core services, creating a custom player, or running codefights
locally.
| Artifacts | Links |
|---|---|
| Repository | https://gitlab.com/microservice-dungeon/infrastructure/deployments/local-dev-env |
Table of contents
About
The local dev environment is a minimal configuration for running the MSD locally in Docker.
For this two Docker Compose files are required: The first file initializes the infrastructure, the second starts the actual services - also refered to as the Core-Services. The infrastructure includes the components required to run and monitor the Core-Services - namely Kafka as the messaging broker, PostgreSQL as the primary database, and the monitoring stack, consisting of Prometheus and Grafana.
Connecting to the Environment
The local dev environment essentially covers three main use cases: Debugging the Core-Services, running a custom Player locally, and to stage a code-fight between multiple players.
Service Debugging
There are to options available for debugging a Core-Service:
A remote debugger can either be used to connect to the JVM’s debug agent running inside the container for placing
breaking points inside the code.
Alternatively, Core-Services can also be run locally directly from IntelliJ and connect to the other running inside
the Local Dev Env via localhost.
The necessary ports required for this are configured and exposed.
It is important to stop the corresponding container inside the Local Dev Env beforehand to prevent conflicts.
Player Deployment
Deploying a player is identical to running a Core-Service.
Players can either be deployed as containers alongside the Core-Services, or run locally from IntelliJ.
In both cases, the existing configuration can be used as a reference.
Accessible Services
The following table shows a listing of all services accessible from localhost.
| Service | Port | Description |
|---|---|---|
| Kafka | 29092 | Advertised listener for external connections outside of docker. |
| PostgreSQL | 5432 | Service endpoint. |
| Prometheus | 3001 | Prometheus dashboard. |
| Grafana | 3000 | Grafana dashboard. |
| Game-Service | 8080 | Service endpoint. |
| Game-Service | 9080 | JVM Debug agent endpoint. |
| Outbox-Service (Game) | 8081 | Service endpoint. |
| Outbox-Service (Game) | 9081 | JVM Debug agent endpoint. |
Getting Started
To get started with the Local Dev Env, clone the repository and follow the instructions below.
Prerequisites
Running the Local Dev Env has the following minimum requirements:
- Docker(-Desktop) or an equivalent OCI Container Runtime with Docker Compose installed
- 4 CPU Cores
- 10GB RAM
Hint: Make sure to check your resource configuration when using Docker-Desktop.
Starting the Environment
First, start the Infrastructure-Services.
Keep in mind, that ‘kafka-init’ is a one time job.
Therefore, it is intended that this container exits.
docker compose -f compose-infrastructure.yaml up -d
Then, start the Core-Services.
docker compose -f compose-core-services.yaml up -d
Make sure all Services are running and are healthy before you continue.
After that, you can start your player if you wish to.
Access Grafana Metrics
Infrastructure- and Core-Services expose metrics, that are collected by Prometheus and are visualized using Grafana.
The Grafana UI can be accessed via localhost:3000.
The default login is admin admin.
Metrics are visualized in Grafana using dashboards. These are not loaded automatically and must be imported manually once. They can be found under /config/grafana/dashboards/. Prometheus must be selected as the data source.
A Docker volume is configured for Grafana so that all dashboards should remain persistent even after a restart.
Shutting down the Environment
To shut down the Local Dev Env, stop the Services in the opposite order.
  docker compose -f compose-core-services.yaml down
  docker compose -f compose-infrastructure.yaml down
7.5 -
Bare-Metal Hosting
Our Bare-Metal hosting is a production Kubernetes setup used to run code fights on a server provided by the TH Köln. The following description is intended to provide an overview of the architecture.
Table of contents
Overview
This page serves as a reference for how and why we set up the server the way we did. As a short overview:
We are using the following software to manage our server:
- RKE2: A Kubernetes distribution that is easy to install and relatively robust.
- Longhorn: A storage solution for Kubernetes that uses the local hard-drive.
- Nginx-Ingress: A reverse proxy that is used to route traffic to the correct service.
- Cert-Manager: A Kubernetes add-on that automates the management and issuance of TLS certificates from letsencrypt.
- Sealed Secrets: A tool for encrypting Kubernetes Secrets into a format that can be safely stored in a public repository.
- ArgoCD: A declarative, GitOps continuous delivery tool for Kubernetes.
- Kustomize: A tool for joining & customizing YAML configurations.
- Helm: A package manager for Kubernetes that makes installing application pretty simple.
We are using a single rocky linux server running RKE2 (a Kubernetes Distribution). All software that is running on the server is defined in our argocd repository. This is picked up by ArgoCD (running on the server) and applied continuously, so any changes to the repository are automatically applied to the server. This also means, manual changes will be discarded within seconds.
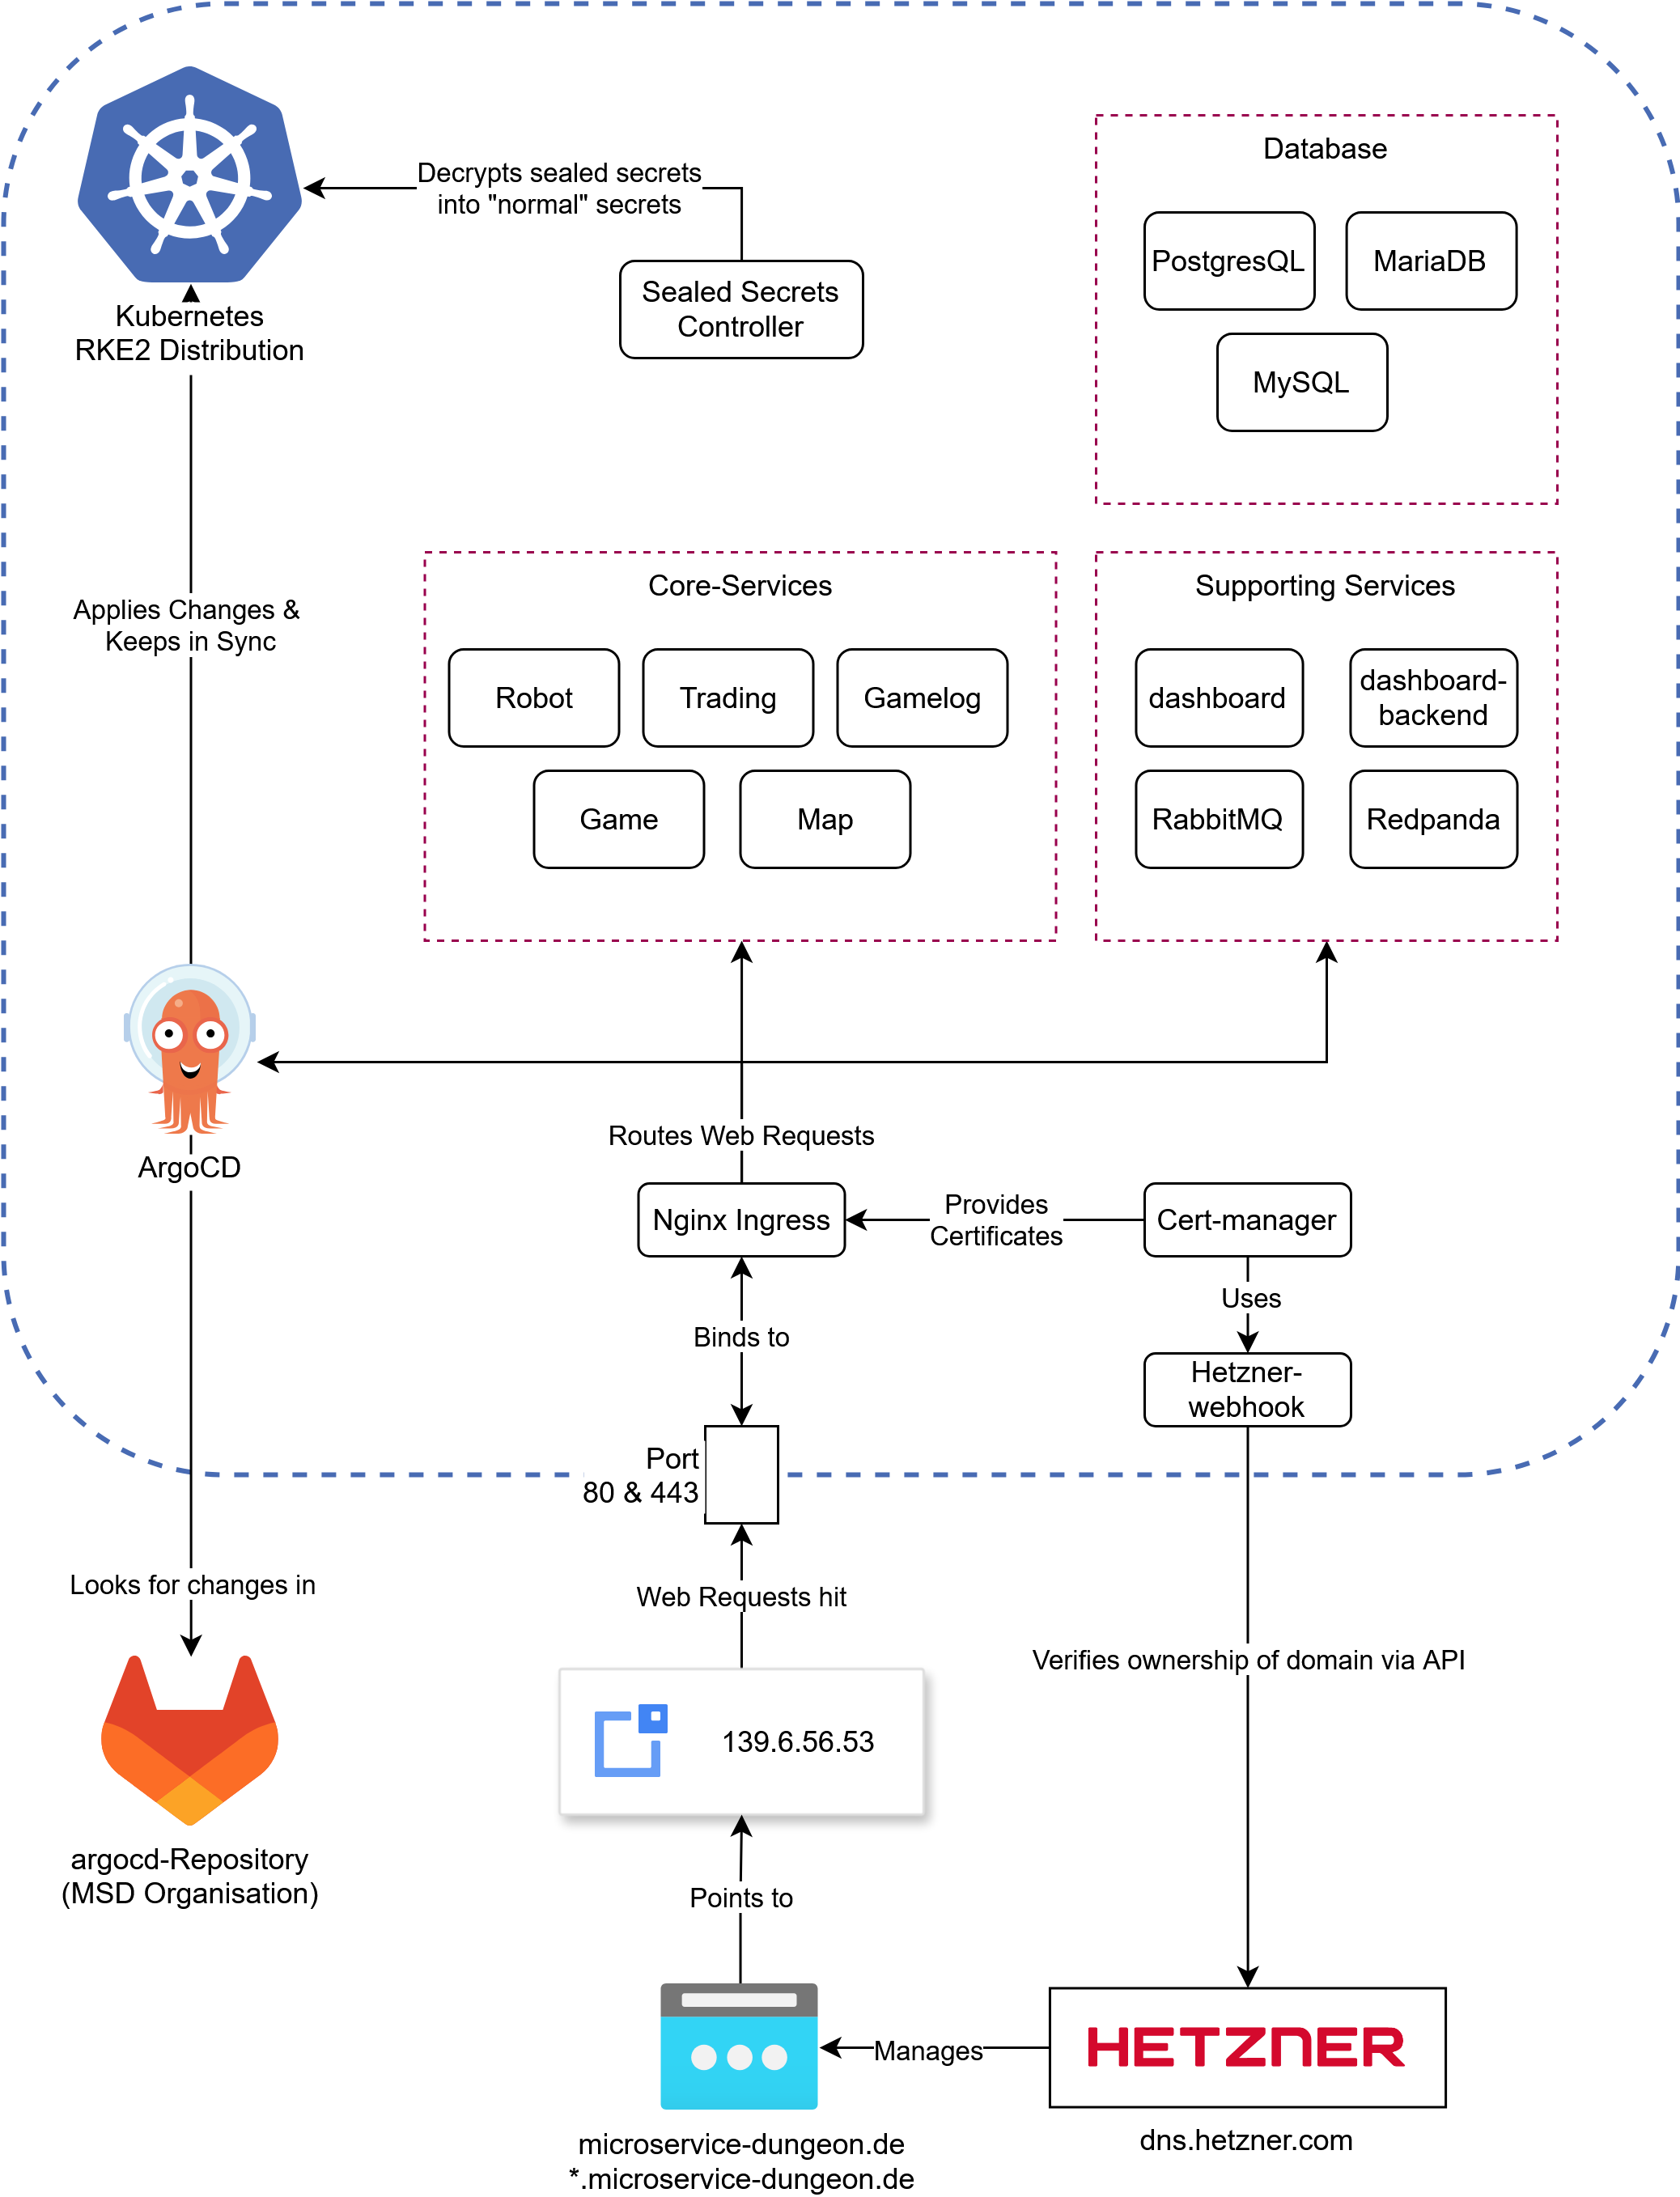
An overview of (almost) all the components running on our server, note that everything in the blue lines is running in Kubernetes
Lets dig into the components shown in here. Starting off with the most important:
ArgoCD
The core principle of ArgoCD is pretty simple: if you want to make a change to your cluster, what do you do?
Use kubectl apply -f my-manifest.yaml. This is essentially what argoCD does, but slightly more sophisticated
and static. Every Manifest you define in an “Application” (we’ll get to that) is applied to the cluster.
The good thing: you can reference a Git repository, and ArgoCD will automatically apply any changes to the cluster.
Under the hood, ArgoCD uses Kustomize, which is a powerful tool for combining, patching and generally customizing YAML files on the fly. For example, if you have two yaml files:
- ingress.yaml
apiVersion: networking.k8s.io/v1 kind: Ingress metadata: name: game spec: ingressClassName: nginx rules: - host: game.microservice-dungeon.de http: paths: - backend: service: name: game port: number: 8080 path: / pathType: Prefix - service.yaml
apiVersion: v1
kind: Service
metadata:
  name: game
spec:
  ports:
  - name: http
    port: 8080
    protocol: TCP
    targetPort: 8080
  selector:
    app.kubernetes.io/instance: game
    app.kubernetes.io/name: game
  type: ClusterIP
You can use Kustomize to combine them into a single file, which can then be applied to the cluster.
In fact, kubectl has built-in support for Kustomize. To know which files to combine how, you have to use
a kustomization.yaml file (named exactly like this), which looks like this:
kind: Kustomization
apiVersion: kustomize.config.k8s.io/v1beta1
resources:
  - ingress.yaml
  - service.yaml
If you run kubectl kustomize . in the directory where the kustomization.yaml file is located, it will
combine the two files into a single file and print it to the console.
This is what ArgoCD does, but it does it for you. You define an “Application” in ArgoCD
which is a pointing to a kustomization.yaml file in a Git repository.
ArgoCD will then automatically apply any changes to the cluster -
just like running kubectl apply -k . in the directory where the kustomization.yaml file is located -
but automatically and continuously as the files change.
Now, we are not only using plain yaml files, but also Helm charts. These are a bit more complex (see Helm if you want to learn what they are and why we use them).
Simply said, Helm is a package manager, which you can use to install applications on your cluster. Most of the time you customize the installation with “values”, which are basically installation
options defined in yaml. Kustomize can be used to render a helm chart but you need to use the --enable-helm flag. For example a kustomization.yaml for cert-manager would look like:
kind: Kustomization
apiVersion: kustomize.config.k8s.io/v1beta1

helmCharts:
  - name: cert-manager
    repo: https://charts.jetstack.io
    version: v1.17.0
    releaseName: cert-manager
    namespace: cert-manager
    valuesFile: certmanager-values.yaml
With the cert-manager-values.yaml file looking like this:
crds:
  enabled: true
This will install cert-manager into the cert-manager namespace,
using the certmanager-values.yaml file to customize the installation. Under the hood ArgoCD converts the chart into
yaml files, you can see this by running kubectl kustomize . --enable-helm in the directory where the kustomization.yaml file is located.
Helm has to be installed on your system for that to work.
In the ArgoCD install process we have set the following parameters to enable Helm support:
configs:
   cm:
    create: true
    kustomize.enabled: true
    helm.enabled: true
    kustomize.buildOptions: --enable-helm
Sealed Secrets
In order for us to store secrets like passwords and other sensitive configurations in our git repo, we need to encrypt them. This is where Sealed Secrets comes in. This is a tool that uses asymmetric encryption with a public and private key to encrypt secrets. You can use the kubeseal cli to encrypt an existing secret like this:
kubeseal --cert sealing-key.pem < secret.yaml > sealed.yaml
This assumes that there is a sealing key (a public key/certificate) lying somewhere on the machine you are using kubeseal on. In our ArgoCD
repository it is provided in the applications folder. If you dont have the key, but have kubectl access,
you can use kubeseal to either fetch the sealing key with
kubeseal --fetch-cert > cert.pem or use kubeseal directly:
kubeseal \
-f path/to/unencrypted/secret.yaml \
-w output/path.yaml \
--controller-name=sealed-secrets \
--controller-namespace=sealed-secrets \
--format=yaml
Once you apply a sealed secret to the cluster, the controller will decrypt it and make it available under the name and namespace of the original secret.
Updating / Merging a secret:
You can merge / update a sealed secret by creating a secret with the same keys as the original
secret and using the --merge-intocommand. Suppose you have your sealed secret sealed.yaml:
apiVersion: bitnami.com/v1alpha1
kind: SealedSecret
metadata:
  name: game-sensitive-config
  namespace: core-services
spec:
  encryptedData:
    DB_NAME: AgCgSNobnCxjTaOpYcDwwfUEqeCAL6loxQDqzWIIgna7B58gbTC3MWUio/...
    DB_PASSWORD: AgBmAh8Yi8Dz+gqVF1GwiFnooEfv8o3xYL3UHEDUhVK2rmSd1f7BHUGVE...
    DB_USER: AgBbVZ99mft7oVuWcHpSV0D+hRRvFousesknAxfVgMdOwRO1BzTYin1SmlRdf...
    RABBITMQ_PASSWORD: AgB5fB3P3O/tLuJyPjg7cu3TQcebJAWJbsqoR4ucy8Z8WFhFJ9L...
and the values you want to change in secret.yaml:
apiVersion: v1
kind: Secret
metadata:
  name: any-name-works
  namespace: core-services
type: Opaque
stringData:
  DB_NAME: "database"
  DB_PASSWORD: "password"
Use the following command to update the sealed secret (optionally with the --cert flag for local use)
kubeseal -o yaml --merge-into sealed.yaml < secret.yaml
Some notes:
- Sealing keys will automatically rotate every 30 days, so you should re-fetch the sealing key every once in a while. If you keep the private keys backed up somewhere, you also need to re-fetch them, as they will also be rotated. This security feature ensures that if one of your decryption keys is compromised, it will only affect the last 30 days.
- Do not commit any unsealed secrets to the repository. If you do, change all the passwords of affected services. Dont just delete the secret, or encrypt it afterwards.
- Sealing is designed to be a one way process. You can unseal a sealed secret if you have the private key but that is not recommended by the developers.
Ingress & TLS
An Ingress is used to route traffic to the correct service. It does so based on host and path, in our case for
example: game.microservice-dungeon.de will route to the game service, while robot.microservice-dungeon.de
will route to the robot service. Some resources might need encryption, in our setup we can use cert-manager
to issue TLS certificates from letsencrypt. You just need to include the annotation
cert-manager.io/cluster-issuer: letsencrypt-production and the tls section in your ingress resource:
  tls:
    - hosts:
        - my.domain.com
      secretName: some-secret-name
Afterwards cert-manager will issue a certificate for your ingress.
If you want to read more about how cert-manager works, read the letsencrypt documentation on HTTP01 and DNS01 Solvers. We use the hetzner-webhook to issue DNS01 challenges, so you can also issue wildcard certificates.
Storage
Storage is usually a bit tricky in Kubernetes, since the hard drives are hooked up to specific nodes.
Even though we only use a single node, we still use longhorn to manage our storage.
It provides a storage class called longhorn-static which you can use to create persistent volumes.
We have a total capacity of 1 TB.
Helm
Helm is a package manager for Kubernetes. It works by using templates to configure installations via a values file. Usually a template will look like this:
apiVersion: apps/v1
kind: Deployment
metadata:
  name:  {{ include "robot.fullname" . }}
  labels:
    {{- include "robot.labels" . | nindent 4 }}
spec:
  replicas: {{ .Values.replicas | int }}
  selector:
    matchLabels:
      {{- include "robot.selectorLabels" . | nindent 6 }}
  template:
    metadata:
      labels:
        {{- include "robot.selectorLabels" . | nindent 8 }}
    spec:
      serviceAccountName: {{ include "robot.serviceAccountName" . }}
      containers:
      - name: {{ .Chart.Name }}
        image: "{{ .Values.image.registry }}/{{ .Values.image.name }}:{{ .Values.image.tag | default .Chart.AppVersion }}"
        imagePullPolicy: {{ .Values.image.pullPolicy }}
        ports:
        {{- with .Values.service.my }}
          - name: {{ .portName | lower }}
            containerPort: {{ .port }}
            protocol: {{ .protocol }}
            {{- end }}
        {{- if .Values.resources }}
        resources:
          {{- toYaml .Values.resources | nindent 10 }}
        {{- end }}
        {{- if .Values.livenessProbe }}
        envFrom:
          - configMapRef:
              name: {{ include "robot.fullname" . }}
        {{- if .Values.env }}
        env:
        {{- range $key, $value := .Values.env }}
          - name: {{ $key }}
            value: {{ tpl $value $ | quote }}
            {{- end }}
        {{- end }}
They are a bit hard to read, but basically they are normal yaml files with placeholders. Everything prefaced
with .values is something coming from the values file. There are some built-in functions like include,
toYaml, tpl and more. Also there are
Fernverwaltung HPC Knoten
Unser Rechenknoten im HPC wird mittels IPMI Fernverwaltet. Um IPMI zu verwenden, müssen wir uns über m02, einen anderen Knoten, einloggen. Danach können wir das ipmitool in der Kommandozeile verwenden. Die Ip-Addressen sind wie folgt:
- goedel-m01: 10.218.112.200
- goedel-m02: 10.218.112.201
Sammlung an Befehlen zum verwalten:
# Status abfragen
ipmitool -U ADMIN -P ag3.GWDG -H 10.218.112.200 -I lanplus power status
# Einschalten
ipmitool -U ADMIN -P ag3.GWDG -H 10.218.112.200 -I lanplus power on
# Ausschalten
ipmitool -U ADMIN -P ag3.GWDG -H 10.218.112.200 -I lanplus power off
# Sensorstatus abfragen (Zeigt Temperaturen, Lüfterdrehzahlen und andere Sensorwerte an.)
ipmitool -U ADMIN -P ag3.GWDG -H 10.218.112.200 -I lanplus sensor
# Stromverbrauch
ipmitool -U ADMIN -P ag3.GWDG -H 10.218.112.200 -I lanplus dcmi power reading
8 - API and Service Reference
The reference documentation for the services of the Microservice Dungeon. If you are a player developer consuming events, or a developer of core services, this is the place to go if you need detailed information about the services and their APIs (both event-based and REST-based).
(TBD)
The reference documentation for the services of the Microservice Dungeon.
- stakeholders: player developers consuming events, developers of core services
- imports the README files from
- core service repos
- java skeleton repo
- ops repos (infrastructure) do not belong here, they belong to Technical Admin Guide
Services
Libraries
8.1 -
Game Service
The Game Service is responsible for managing players and games.
Participants of the Microservice Dungeon register once as a player in order to take part in games.
Table of contents:
Player Registration
To participate in the Microservice Dungeon, players register once using a unique playerName.
Each player receives a unique playerId upon registration, which identifies the player across the entire application.
To take part in a game, a player joins an open game using their playerId.
FAQ
I have already registered with my playerName but have forgotten the playerId.
- The log-compacted Kafka topic
db.player.ecst.v1contains all registrations that have ever taken place. If theplayerNameis to be reused, the corresponding event must be identified. Checkout the AsyncAPI for details.
8.1.1 -
8.1.2 -
8.2.1 -
8.3 -
Outbox-Service
The Outbox Service is part of the Outbox Pattern. As such, it reads messages from the outbox and publishes them to Kafka.
Table of contents
Outbox Pattern
An Outbox solves the problem of the technology gap that occurs, when data needs to be written consistently and atomically to two independent systems - in this case, PostgreSQL and Kafka. To achieve consistency, a shared transaction between both systems would be required - also known as a global transaction. However, since these are independent systems, this is not easily possible.
The Outbox Pattern solves this problem for producers by relying on a single system - in this case, the database. Domain updates and events are stored within a single local transaction. Reading and publishing the events is handled by another service - the Outbox-Service. This results in an at-least-once, in-order delivery guarantee, as long as there is only one reader per partition.

The graphic shows the integration of the Outbox-Service.
About
The responsibility of the Outbox-Service is to read messages from the outbox and forward them to Kafka.
The respective topics and partitions must be configured in advance. For each configured topic, the service starts a virtual thread that periodically polls the outbox for new messages. If message is found, it is forwarded to Kafka and then deleted from the outbox. If a crash occurs during this process, duplicate publications may occur.
Important: A partition must be read by only a single Outbox-Service instance. Otherwise, race conditions will occur. There is no leader election mechanism between Outbox-Service instances.
8.3.1 -
8.4 -
Outbox Lib
A library implementing the Outbox Pattern for reliable publication of events to a messaging broker (like Kafka) with an
at-least-once, in-order delivery guarantee of messages.
Therefore, consumers of these messages must be able to handle duplicates — for example, by checking a
message’s sequence-id.
Table of contents:
Outbox
An Outbox solves the problem of the technology gap that occurs, when data needs to be written consistently and atomically to two independent systems - in this case, PostgreSQL and Kafka. To achieve consistency, a shared transaction between both systems would be required - also known as a global transaction. However, since these are independent systems, this is not easily possible.
Transaction Managers
One possible solution is the use of global transactions through a transaction manager.
This manager orchestrates transactions between both systems - provided both support the necessary 2 Phase Commit
Standard.
Using a transaction manager guarantees an exactly-once, in-order delivery of messages.
However, the downside is that the use can be complex, often involves commercial products and significantly reduces
both response time and throughput of both systems.
Outbox Pattern
An alternative solution is the use of the Outbox Pattern. This resolves the technology gap by relying on a single system - in this case, the database. Domain updates and events are stored within a single local transaction in the database. Reading and publishing the events is handled by another service - in the MSD, this is the Outbox-Service.
This service polls the Outbox for new events and publishes them in order per partition per topic. If a crash occurs after the polling while events are being published, the next poll may retrieve events that have already been published. This can lead to duplicates. Therefore, the delivery guarantee of an Outbox is at-least-once, in-order.
About
The Outbox Lib covers both use cases of an Outbox - writing to the Outbox and reading from it. To achieve this, the library extends a service’s database schema with an additional table - the Outbox. Producers can then store the events to be published within a transaction together with all related domain changes.
Installation
To integrate the library into an existing project, several steps must be followed. These steps are described below.
Requirements
The library defines the following requirements for integration. Failure to comply may lead to unexpected conflicts or errors.
- Java 21
- Spring Boot 3.5.9
- Spring Data JPA
- Postgres 17.x
- Flyway (or similar tool)
1. Add to Maven
The library’s packages are hosted in the Gitlab repository’s registry. For this reason, both the registry and the package dependency must be declared in Maven.
First, add the corresponding Gitlab Registry as follows:
    <repositories>
        <repository>
            <id>msd-gitlab-outbox-lib</id>
            <url>https://gitlab.com/api/v4/projects/71089152/packages/maven</url>
        </repository>
    </repositories>
Then, declare the Outbox library as a new dependency:
    <dependency>
        <groupId>de.microservice-dungeon</groupId>
        <artifactId>outbox-lib</artifactId>
        <version>7.1.7</version>
    </dependency>
2. Enable in Spring
JPA and Spring Data JPA are used for database interaction. However, Spring limits the detection of JPA annotations to the classpath of a project. This means that Spring does not automatically recognize the library’s annotations. To enable this, the following annotations must be added to the main project’s application service.
@SpringBootApplication@EnableJpaRepositories("de.microservicedungeon")@EntityScan("de.microservicedungeon")
For @EnableJpaRepository und @EntityScan both the package path of the project and that of the library must be
specified.
For the library, this path is de.microservicedungeon.
In the following example, the path prefix of both projects is identical.
@SpringBootApplication
// must include both package paths
// here, both projects share the same prefix
@EnableJpaRepositories("de.microservicedungeon")
@EntityScan("de.microservicedungeon")
public class GameServiceApplication {

    public static void main(String[] args) {
        SpringApplication.run(GameServiceApplication.class, args);
    }
}
3. Add Database Schema
The library requires a database schema that must be created initially and migrated during version upgrades.
This schema is located under /database/migration/.
For each schema change, two scripts are provided: a migration script starting with the letter V and a base script
starting with B.
Important: The schema must be created manually; there is no automation for this. Using Flyway or a similar migration tool is recommended.
4. Configure
Each target topic must be configured for the Outbox library with its name in Kafka. The reason is that sharding occurs when events are written to the Outbox. To determine the appropriate partition, the partition size of a topic must be known. This size is automatically retrieved for each configured topic using Spring Kafka-Admin.
The following example shows the configuration of two topics:
# resources/application.yaml
    outbox:
        topics:
            - name: db.player.ecst.v1
            - name: bl.player.events.v1
Update
Library updates follow the Semantic Versioning convention. Any change to the database schema is considered a breaking change and results in an increment of the major version. However, all major versions are exactly one version backward compatible to support parallel operation of both schemas. For each major version, the availability of a new schema must be checked.
Usage
Reading and writing to the Outbox is done through two interfaces, whose usage is described below. A Spring Boot autoconfiguration creates a bean for each interface, which can be overwritten with a custom configuration if needed.
Writing to the Outbox
To write to the Outbox, a WriteOutbox instance is required.
One or more OutboxWritableevents can be passed to this instance as arguments.
Important: Domain updates and writes to the Outbox must occur within the same transaction - see the JavaDoc for further details.
Reading the Outbox
To read from the Outbox, a ReadOutbox instance is required.
This instance allows reading the partitions of a topic.
Retrieval follows a read and acknowledge pattern.
Until a acknowledgement succeeds, the same events may be returned repeatedly - see the JavaDoc for further details.
Important: A topic’s partition must not be read concurrently!
8.5 -
tba.
9 - Knowledge Base
A collection of selected topics that can support further development or the creation of a custom player.
A collection of selected topics that can support further development or the creation of a custom player.
Event Driven Architectures
Databases
9.1 -
Idempotent Event Consumer
Consumers must be able to process events idempotently. In general, an at least once delivery guarantee is assumed. This means that a consumer may receive the same event multiple times.
There are several reasons for this:
-
Typically, consumers receive and acknowledge events in batches. If processing is interrupted, the same batch will be delivered again. If some events in the batch have already been processed, a non-idempotent consumer will process them again.
-
Some brokers (including Kafka) support transactions, allowing receiving, acknowledging, and sending new events to occur atomically. However, it’s not that simple:
-
First, these transactions are very costly and lead to significantly higher latencies. In larger systems, those costs add up. These costs arise because processing no longer happens in batches as each event is transmitted individually, along with additional calls similar to a two-phase commit.
-
Second, this approach only works as long as a single technology is used. Otherwise, a transaction manager is required - the difference between local and global transactions. Else, events may be lost or published multiple times — bringing us back to the original problem. (See atomic event publication)
-
Idempotent Business Logic
In most (or even all?) cases, business logic can be made idempotent. It’s important to distinguish between absolute and relative state changes.
-
Absolute state changes:
With an absolute state change, a value is typically replaced by a new one — such as an address. These operations are always idempotent. -
Relative state changes:
A relative state change occurs when, for example, an amount is deducted from an account balance. Reprocessing the event would alter the balance again. Alternatively, an account balance can be modeled as a sequence of transactions. If the event ID is unique and part of the SQL schema, reprocessing would result in an error — this is essentially event sourcing.
Remembering Processed Events
Alternatively, the IDs of processed events can be stored in the database. Before processing, a lookup can be performed to check whether the event has already been handled.
For consistency, it’s crucial that storing the event ID happens within the same transaction as all other domain changes.
A prerequisite for a simple solution without locking is that the same event cannot be processed in parallel by different consumers. With brokers like Kafka, this is guaranteed — there can only be one consumer per partition.
Transactional Event Processing
Another alternative is the use of local (or global) transactions, accepting the associated drawbacks — assuming the broker supports transactions at all.
It’s important to note that when using multiple technologies, a transaction manager is required. Local transactions only work within a single technology — in this case the broker. That’s why exactly once processing works in Kafka Streams, where Kafka supports the role of a database as well.
9.2 -
Atomic Event Publication
Every change in a domain leads to the publication of an event in an event-driven architecture.
For the overall system to remain consistent, it would be ideal if the change and the publication occurred atomically within the same transaction. This would provide the highest possible level of consistency.
However, this is not easily achievable as database and broker are typically separate systems. To enable a global transaction across both, a transaction manager would be needed.
💡 A local transaction refers to a transaction within a single system (or technology), such as a database. When multiple systems are involved, separate local transactions are created independently. What’s missing is a mechanism to coordinate them. That’s where the transaction manager comes in — a separate system that synchronizes local transactions into a global transaction. This is the only way to achieve exactly once semantics across systems. All other approaches relax this guarantee.
The problem is very similar to ACID and CAP considerations in distributed systems, where trade-offs are made between different properties—or guarantees.
What are these guarantees?
-
Ordering Guarantees
A guarantee regarding the order of processing—whether it must match the original processing sequence or not. -
Delivery / Publication Guarantees
A guarantee regarding the delivery of events—whether events may be delivered multiple times, exactly once, or at most once. -
Read Your Writes
A guarantee about immediate consistency — i.e., whether a system can read its own changes right after writing them.
It’s important to note that some guarantees exist along a spectrum. The theory is much more detailed, so this section serves merely as an introduction. There are three approaches to solving this problem. Each fulfills different guarantees and comes with its own trade-offs.
Transaction Manager
A transaction manager coordinates local transactions across independent systems — essentially acting as the orchestrator of a two-phase commit (2PC).
exactly once in-order - A transaction manager provides by far the highest level of consistency between two systems. For this reason, it is often used in banking systems.
Disadvantages
-
Performance
A transaction manager introduces significant overhead, as it is a separate service that orchestrates a 2PC between systems. In Kafka, for example, using local transactions would also mean that events could no longer be processed in batches. -
Cost
Transaction managers are often commercial products — there are few, if any, free alternatives. -
Support
The involved systems must implement certain standards to integrate with a transaction manager.
Transactional Outbox Pattern
With a transactional outbox, the problem of independent transactions is deferred by storing events in the database as part of the same local transaction. A separate process reads and publishes these events in order.
at least once in-order – The storage of events happens exactly once, while their publication is at least once. The problem of independent transactions is effectively shifted by this pattern. As long as reading and publishing do not happen concurrently, the event order is preserved.
Types of Transactional Outboxes
-
Polling Outbox
The database is regularly polled for new events. This approach has higher latency and significantly increased resource consumption. -
Tailing or Subscriber Outbox
This type subscribes to a change stream of the database. Databases like Redis and MongoDB offer built-in subscriber mechanisms. For others, the write-ahead log can be used to achieve the same effect.
Further Considerations and Challenges
-
Scaling
As throughput increases, scaling and latency can become issues. Depending on the context, sharding may help—but it’s important that the outbox sharding aligns with the broker’s sharding. Otherwise, event ordering may break. -
Single Point of Failure
A single outbox instance represents a single point of failure. Therefore, a cluster with leader election is needed to ensure high availability and low latency.
Event Persistence
Similar to the outbox pattern, events are stored in the database along with an additional status field. However, unlike the outbox, events are published by the same process followed by a status update.
An additional process periodically scans the database for unpublished events and publishes them as a fallback.
at least once out of order – Due to the nature of the publishing mechanism, maintaining the correct order is a best effort.
💡 This is by the way the mechanism Spring Modulith uses for its internal eventing. Something to keep in mind.
Separate Transaction
Another option is to more or less ignore the problem.
at most once in-order – Both local transactions would — if possible — be nested, so that a failure in the inner transaction leads to a rollback of the outer one. However, if the outer transaction fails after the inner one has been executed, this will inevitably lead to inconsistency.
💡 This is exactly what happens when using @Transactional in Spring-Kafka and Spring-Data without an external transaction manager.
9.3 -
Database Isolation Levels
During parallel execution of transactions, a variety of race conditions can occur. Transaction isolation levels are methods used to prevent these. Each level is characterized by the type of race condition it prevents. Moreover, each level also prevents all the race conditions addressed by the previous levels. It is important to note that each database engine implements these levels differently.
| Dirty Read | Non Repeatable Read | Write Skew (Phantom) | |
|---|---|---|---|
| Read Uncommitted | X | X | X |
| Read Committed | X | X | |
| Repeatable Read | X | X | |
| Serializable |
Table of contents
Read Committed
The lowest of the isolation levels that provides the following guarantees:
- All reads operate on data that has been fully committed.
No dirty reads. - All writes operate on data that has been fully committed.
No dirty writes.
Without these guarantees, the level is referred to as Read Uncommitted.
Dirty Reads
In a dirty read, a transaction reads the uncommitted changes of ongoing transactions. This allows the reading of intermediate states. If any of these transactions then fail, data that should never have existed would have been read.
Dirty Writes
In a dirty write, an update is made to the uncommitted changes of a concurrently running transaction. This poses a problem because, depending on the timing, only parts of each transaction might be applied.
Example:
- Buying a car requires updates to two tables — the listing and the invoice. Two interested parties, A and B, try to
buy the same car at the exact same time.
- Transaction A updates the listing, but then briefly pauses (this may happen due to a CPU context switch).
- Transaction B overwrites A’s update on the listing.
- Transaction B updates the invoice.
- Transaction A resumes and overwrites the invoice.
- Buyer B has purchased the car (last write operation), but buyer A receives the invoice.
To implement Read Committed, PostgreSQL, for example, uses Multi-Version Concurrency Control (MVCC) based on timestamps. Transactions only read data that was written before their start.
Repeatable Read
The isolation level above Read Committed, which additionally prevents nonrepeatable reads. Also referred to as Snapshot Isolation because each transaction operates on its own snapshot of the database.
Nonrepeatable Reads (or Read Skew)
A nonrepeatable read (also known as read skew) occurs when an aggregate function (such as SUM) is applied to a range of rows that change during its computation — particularly entries that have already been read. This affects inserts, updates, and deletes equally. If re-executing the function yields a different result, it is considered a nonrepeatable read.
Example:
| ID | Salary |
|---|---|
| 1 | 1000 |
| 2 | 2000 |
| 3 | 3000 |
| 4 | 2500 |
| 5 | 1000 |
A session executes a SUM over the salaries. Meanwhile, the employee with ID 3 is deleted — at the moment the computation reaches ID 4. As a result, an incorrect total salary is calculated.
Nonrepeatable reads are especially dangerous for long-running processes that rely on data integrity, such as backups, analytic workloads, and integrity checks.
Serializable
The highest isolation level, where transactions are executed sequentially — at least according to the standard. In reality, databases deviate from this. For example, PostgreSQL uses monitoring to detect conflicts between concurrently running sessions. In the event of a conflict, one of the two transactions is aborted.
Sequential execution prevents lost updates, write skews, and phantoms. However, these issues can also be avoided through proper locking.
Lost Updates
A lost update is a read-modify race condition on a shared row. Here, one session reads a value as input for a calculation and then updates it. Meanwhile, a parallel session updates the same value between the read and write operations. This intermediate update is lost.
Example:
- Session A reads the value 3 and intends to increase it by 2.
- Between read and the write, a parallel session writes the value 4.
- When Session A writes the value 5, the update to 4 is lost.
Solutions include serialized execution, locking, and atomic operations, although the use of atomic operations is limited to specific cases.
Write Skew (Phantoms)
A write skew is a race condition involving reads on shared entries and writes on separate entries. This applies equally to inserts, updates, and deletes.
Example (1) — materialized:
- A hospital’s shift plan requires that at least one doctor is on call at all times. For one evening, two doctors (A) and (B) are scheduled. Both wish to sign off.
- (A) and (B) attempt to sign off at the same time. The system checks in parallel whether at least one doctor remains on call — which is true in both cases. Both are removed concurrently.
- As a result, no doctor remains on call.
Example (2) — unmaterialized:
- Booking a meeting room is handled through time slots; stored as entries with a start and end time, assigned to a room and a responsible person.
- Two people (A) and (B) try to book the room at the same time. The system checks if a booking exists for the requested time slot — in both cases, none is found. Two new entries are created simultaneously.
The difference between Example (1) and Example (2) is that in (1) the conflict is materialized, while in (2) it is not. This means in (1) there are existing entries that could be locked; in (2) there are no entries yet — and you cannot lock what doesn’t exist.
Solutions include serialized execution and locks. However, locks require a materialized conflict — or they must be applied to the entire table.
Postgres Specifics
Repeatable Read
In PostgreSQL, Repeatable Read is implemented as snapshot isolation using MVCC. Each transaction sees a snapshot of the database taken at the moment it starts. The following points are important:
- Locking
Locks are applied independently of versions. Only entries visible in the transaction’s snapshot are considered — newer entries are ignored. - Exception Handling
When executing updates, deletes, or applying locks, an exception is thrown if a newer version of the affected entries exists outside the snapshot. Read-only queries without locking are not affected.
On the application side, proper error handling must involve retrying the entire transaction in order to work with a newer snapshot.
Serializable
This isolation level extends the snapshot isolation of Repeatable Read by adding conflict monitoring through predicate locks. True serialization is not achieved; instead, an optimistic approach is used, resolving conflicts by aborting transactions when they are detected.
Access to entries is recorded as predicate locks — visible in pg_locks. If a conflict arises, one of the involved transactions is aborted with an error message. Predicate locks do not play a role in deadlocks!
Important points when using Serializable:
- Exception Handling and Consistency
Applications must implement error handling for serialization exceptions by retrying the entire transaction. - Read Consistency
Reads are only considered consistent after a successful commit because a transaction may still be aborted at any time.
This does not apply to read-only transactions. Their reads are consistent from the moment a snapshot is established; these transactions must be flagged as read-only. - Locking
Explicit locking becomes unnecessary when Serializable is used globally. In fact, for performance reasons, explicit locks should be avoided! - Mixing Isolation Levels
Conflict monitoring only applies to transactions running under Serializable. Therefore, it is recommended to set the isolation level globally.
Important:
Keep in mind that sequential scans and long-running transactions can lead to a high number of aborts as the
number of concurrent users increases. Serializable works best with small, fast transactions.
10 - Frequently Asked Questions
Answers to frequently asked questions about the Microservice Dungeon.
(TBD)
11 - How To Contribute to the Microservice Dungeon
Description how you can contribute to the Microservice Dungeon project.